GraphRAG 个人部署

如何本地运行 graphrag

有条件的朋友们可以在本地部署 graphrag 哦,然后可以将你的私人文档喂进去,成为你自己的私有得力助手!

需要的工具

本篇指导内容将基于你的个人电脑来构建 graphrag,在开始之前,需要你的电脑有:

  • 3060TI GPU 一张,显存为 8 GB
  • 内存空间不少于 16 GB
  • 硬盘空间不少于 50 GB

检查好设备后,还需要你有如下的软件环境:

docker内需要下载:

  • graphrag 源码,我当前用的版本是 0.3.0
  • FastChat 这是基于大模型的训练、服务开源框架
  • Vllm 加速大模型推理的推理开源框架

此外,我们还需要用到一些 LLM 权重,你可以自己挑选你喜欢的模型,也可以按照后面的教程下载:

  • 下载好的 LLM 权重数据(你可以从huggingface网站上选择可以在本地运行的合适的大模型)
  • 下载好的 LLM embedding 模型权重数据(同样也需要从huggingface网站上下载)
  • 下载好的 encode 模型(参考这篇博客下载)

好,准备好后就可以开始了!

环境安装流程

首先,启动 docker:

docker 内拉取 Nvidia 发布的 pytorch docker 镜像,不宜选择太老的镜像,最好是 2.2 版本以后,可以选择这个镜像:nvcr.io/nvidia/pytorch:24.06-py3

1
docker pull nvcr.io/nvidia/pytorch:24.06-py3

进入 docker:

1
2
3
docker run --priviledged=true --pid=host --ipc=host --network=host --shm-size=8g --ulimit memlock=-1 \
--ulimit stack=67108864 --init -it -v <dir-you-want-to-mnt-on-the-docker>:<path-in-the-docker> \
-w /workspace --name=<container-name> nvcr.io/nvidia/pytorch:24.06-py3 bash

简单给大家解释一下启动 docker 的命令。
这个命令是用来在Docker中运行一个容器的,它包含了多个选项(options)来配置容器的运行环境。下面是对每一个选项的详细解释:

  • --privileged=true:给容器内部 root 权限

  • --pid=host:允许容器共享宿主机的PID(进程ID)命名空间

  • --ipc=host:允许容器能够使用宿主机的IPC(进程间通信)命名空间

  • --network=host:允许容器直接使用宿主机的网络堆栈

  • --shm-size=8g:设置了容器内共享内存(SHM)的大小为8GB

  • --ulimit memlock=-1:设置容器内进程的内存锁定(memlock)限制。-1表示取消限制,允许进程锁定任意数量的内存。

  • --ulimit stack=67108864:设置了容器内进程的栈大小限制为64MB(67108864字节)。

  • --init:这个选项在容器内运行一个小的初始化进程(通常是tinidummy-init),这个进程会作为PID 1运行,并负责处理僵尸进程和信号转发。

  • -it:这是两个选项的组合。-i(或--interactive)保持容器的标准输入开放,而-t(或--tty)分配一个伪终端。这两个选项通常一起使用,以提供一个交互式shell。

1
2
pip3 install --upgrade pip
pip3 install setuptools==69.5.1

进入到 FastChat 目录后,从源码编译安装 FastChat:

1
2
cd FastChat
pip3 install -e ".[model_worker,webui]"

安装 vllm,需要根据你镜像中使用的 pytorch 版本来决定 vllm 的版本,一般来说安装的 vllm 版本越新越好。

1
pip install vllm==0.6.0

安装 vllm 期间,pip 可能会自动帮你安装 pytorch、transformers 等库,这些也都是必要的。

需要额外提一嘴的是,flash-attention-2 这个包的编译过程对我们小电脑来说极为不友好,参考这里的链接。而安装 2.4.2 版本的 flash-attn 还会出现 undefined symbol 错误,我的建议是不如直接删了:

1
pip uninstall flash-attn -y

这里力荐 vllm 最近发布了专用版的 vllm-flash-attn,安装相对简单,速度也不逊于真正的 flash-attn。

1
pip install vllm==2.6.1

安装 graphrag,源码安装开发版,可根据 graphrag 官网 get start,需要先安装 pipx 和 poetry

1
2
3
apt update && apt install pipx
pipx install poetry
poetry install

我推荐你直接 pip install 安装:

1
pip install graphrag==0.3.6

至此,环境基本安装完成了!

graphrag 运行

初始化与文件配置

前面提到,要让 graphrag 在本地运行,需要三个模型权重:

  • 对话 LLM 权重数据,受设备限制,我选择了 Qwen2.5-3B-Instruct-AWQ (不得不说 Qwen 系列的模型真的很丰富)
  • embedding 权重模型,同样受设备限制,并且考虑到主要使用语言是中文,因此选择了 BAAI/bge-base-zh-v1.5
  • cl100k_base tiktoken model 分词模型

首先,我们需要离线地使用 cl100k_base 分词模型,下载方式参考这篇博客

加入下面的全局变量,使之使用本地的 cl100k_base tiktoken model:9b5ad71b2ce5302211f9c61530b329a4922fc6a4

1
export TIKTOKEN_CACHE_DIR=<path-to-cl100k_base tiktoken model-without-filename>

创建 ragtest 文件夹,并初始化它。该文件夹中可以放置我们的输入文档资料,graphrag 配置以及输出日志,文档向量数据等等:下面的步骤与官方给出的开始文档一致

1
2
3
mkdir -p ./ragtest/input
# 将咱们要喂进去的文档放到 ./ragtest/input/ 下面 这里仅作示例
curl https://www.gutenberg.org/cache/epub/24022/pg24022.txt > ./ragtest/input/book.txt

初始化 ragtest:

1
python -m graphrag.index --init --root ./ragtest

初始化完成后,ragtest 文件夹内会存在一个 settings.yaml 的配置文件,其中包含了很多关于 graphrag 和 FastChat 连接的配置信息。因为我们是本地运行,所以需要我们根据实际情况做调整后部署 graphrag,以下是配置文件示例:

1
2
3
4
5
6
7
8
9
10
11
12
13
14
15
16
17
18
19
20
21
encoding_model: cl100k_base		# use encoding model: cl100k_base
skip_workflows: []
llm:
api_key: ${GRAPHRAG_API_KEY}
type: openai_chat # or azure_openai_chat
model: Qwen2.5-3B-Instruct-AWQ # 对应了我们使用的 LLM 模型
model_supports_json: true # recommended if this is available for your model.
max_tokens: 8000 # Qwen2.5 支持最大上下文 128K 我们这里先设 8K
request_timeout: 100.0
api_base: http://localhost:8000/v1 # 对应了 openai server 的端口

## ...

embeddings:
async_mode: threaded # or asyncio
llm:
api_key: ${GRAPHRAG_API_KEY}
type: openai_embedding # or azure_openai_embedding
model: bge-base-zh-v1.5 # 对应了我们使用的 embedding 模型
api_base: http://localhost:8000/v1 # 对应了 openai server 的端口
## ...

启动模型

graphrag 能顺利运行的前提就是大模型能顺利运行,因此首先需要启动大模型后端。

Fastchat 是控制和管理大模型后端服务的框架,我们首先启动控制器:

启动 fastchat controller,默认端口 21001:

1
2
nohup python -u -m fastchat.serve.controller --host 0.0.0.0 \
>> fastchat_controller.log 2>&1 &

使用 Fastchat 启动 vllm_worker Qwen2.5-3B-Instruct-AWQ 模型,启动的 vllm work 端口要与 controller 连接上:

1
2
3
4
nohup python -u -m fastchat.serve.vllm_worker \
--model-path ../Qwen2.5-3B-Instruct-AWQ --trust-remote-code --max-model-len 16000 \
--host 0.0.0.0 --port 8001 --controller-address http://localhost:21001 \
--worker-address http://localhost:8001 >> fastchat_worker_qwen.log 2>&1 &

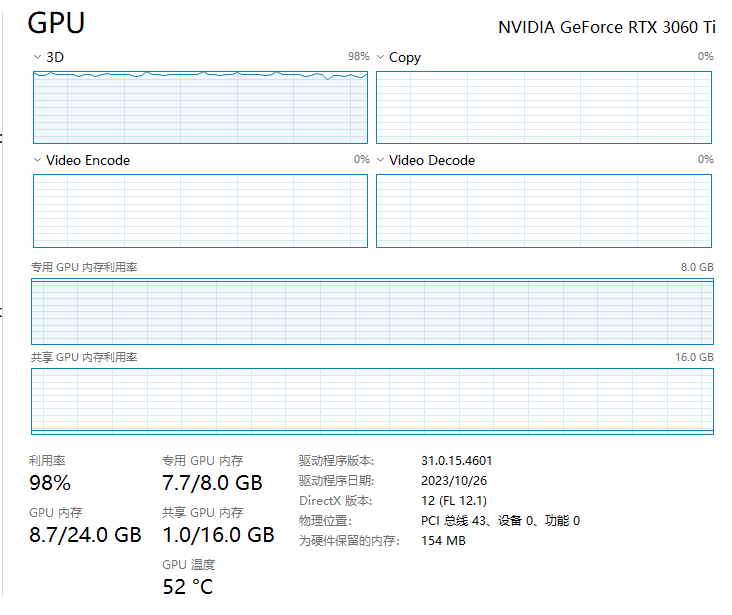
在选择 LLM 这块我经过多次尝试,发现 8GB 显存的显卡最好选择 3B 的量化模型,太小的模型(1.5B)因为能力不足无法构建 graphrag 的知识图谱,而太大的模型(7B量化)就只能允许使用不到 5000 的上下文长度(model len)了。虽然 3B 量化模型很小,但 8GB 显存依然只能将 model-len 设置为 16K,过大的 model-len 会导致 KV-Cache 占用的显存超出 GPU 的显存能力范围。

从下面图可以看到,model-len 为 16K 已经是贴着 GPU 的最大内存在跑了:
使用 Fastchat 启动 bge-base-zh-v1.5 embedding 模型,同样端口要与 controller 连接上:

1
2
3
4
nohup python -u -m fastchat.serve.model_worker \
--model-path ../bge-base-zh-v1.5 \
--host 0.0.0.0 --port 8002 --controller-address http://localhost:21001 \
--worker-address http://localhost:8002 >> fastchat_worker_bge.log 2>&1 &

这些模型的权重文件数据都比较大,需要耐心等待若干分钟,待模型权重load完成,后端服务成功启动后,再启动 Fastchat 内的 openai API server

1
2
nohup python -m fastchat.serve.openai_api_server \
--host 0.0.0.0 --port 8000 >> fastchat_server.log 2>&1 &

这一切都完成后,使用 curl 来验证一下模型是否都成功运行了:

1
curl http://localhost:8000/v1/models

发现返回是这个,说明成功了:

1
{"object":"list","data":[{"id":"Qwen2.5-3B-Instruct-AWQ","object":"model","created":1729782366,"owned_by":"fastchat","root":"Qwen2.5-3B-Instruct-AWQ","parent":null,"permission":[{"id":"modelperm-HYV9FyQLtN3VmgJbB5JGZr","object":"model_permission","created":1729782366,"allow_create_engine":false,"allow_sampling":true,"allow_logprobs":true,"allow_search_indices":true,"allow_view":true,"allow_fine_tuning":false,"organization":"*","group":null,"is_blocking":false}]},{"id":"bge-base-zh-v1.5","object":"model","created":1729782366,"owned_by":"fastchat","root":"bge-base-zh-v1.5","parent":null,"permission":[{"id":"modelperm-i6VUn5ahHcW6bN2FywLqV2","object":"model_permission","created":1729782366,"allow_create_engine":false,"allow_sampling":true,"allow_logprobs":true,"allow_search_indices":true,"allow_view":true,"allow_fine_tuning":false,"organization":"*","group":null,"is_blocking":false}]}]}

然后,就是我们的 graphrag 大显身手的时候了!

离线处理

启动 indexing pipeline,graphrag 开始调用后端的 embedding LLM 等模型对文档做离线切分,创建知识图谱,构建社区总结等等工作,该步骤会花费很长时间,可以离线完成:完成后,数据将会保存在 ragtest/output/${timestamp} 下面

1
python -m graphrag.index --root ./ragtest

我的 3060TI 孜孜不倦地跑了近二十分钟后,它终于构建出了知识图谱,完成了索引阶段的工作:

在线查询

全局查询:当用户提出的问题需要模型查询多个文档块,做出综合性地、归纳性地回答时使用,

CLI 查询示例:

1
2
3
4
python -m graphrag.query \
--root ./ragtest \
--method global \
"What are the top themes in this story?"

局部查询:当用户提出的问题需要模型仔细查阅文档细节后将答案提前出来时使用,

CLI 查询示例

1
2
3
4
python -m graphrag.query \
--root ./ragtest \
--method local \
"Who is Scrooge, and what are his main relationships?"

更多使用细节和配置方法,请详细参考官方文档

我自己的实践中,我使用这篇文档作为输入,随后针对我给出的文档,向 graphrag 提出了下面的问题,它给出了针对性的回答,以及模型内部自己知识的回答:


GraphRAG 个人部署
https://dingfen.github.io/2024/10/13/2024-10-20-graphrag/
作者
Bill Ding
发布于
2024年10月13日
更新于
2024年11月9日
许可协议