VLLM custom allreduce 实现

vllm custom allreduce 实现

动机

用过 vllm 执行大模型的读者应该很清楚, vllm 使用张量并行(tensor parallel)的方式执行多卡推理。在 Self-Attention 和 MLP 层会将张量分布到各个 GPU worker 上计算,因此各个 GPU 上计算的只是一部分矩阵乘的数据,故完成计算后所有的 GPU worker 需要将结果“汇总”起来,即执行 allreduce,才能获得所有的结果,进而开始后续的操作(比如 dropout 或者 layernorm)。

allreduce 示例

也就是说,执行一次有 N 层 LLM 的推理,多个 GPU worker 间就需要执行至少 2×N2\times N 次 allreduce。考虑到 N 通常为 32-128 之间,且执行 allreduce 会阻塞后续模型的推理进度,因此 allreduce 性能会直接影响 vllm 多卡推理的效率。

而在 decoding 阶段,对于一个 sequence 来说,vllm 的一次推理只会推出一个 token,因此 decoding 阶段的 allreduce 的通信的数据量非常小。我们以 llama2-70b 模型在推理 batch size 为 32 时的场景为例,其decoding 阶段需要的 allreduce 通信数据量仅为 32×8192×2=51232\times 8192 \times 2=512 KB。可见即使在 70B 大模型上运行较大的 batch size 所带来的通信量也是非常少的。

在没有 vllm custom allreduce 时,我们会直接使用 nvidia GPU 的 NCCL 通信库来完成 allreduce。但是,对于上述小 size 的 allreduce 场景,NCCL 存在以下问题:

  1. 多 stage,不是延迟最优的。NCCL 实现的带宽最优的树或环状 allreduce(具体实现可以参考 Ring Allreduce,它们分别具有 O(logn) 和 O(n) 个阶段传输过程(n 为 GPU 数)。考虑到现代 nvidia GPU 间的巨大带宽(A100 的有效双向带宽有 480 GB/s !), NCCL 实现的 allreduce 显然更适合大数据传输的场景,对于小 size 场景,我们更希望其延迟中的启动传输(或同步)时间更少,而不必担心数据真正的传输时间太长。
  2. 不利于内核融合。NCCL 对于 vllm 开发人员来说是黑盒,很难被进一步融合优化。而如果 vllm 使用自己的内核,那么就能更轻松地做算子融合操作
  3. CUDA graph 不友好。NCCL 的 cuda graph 需要插入同步主机的节点,这会阻塞 GPU,导致 GPU 流出现间隙:

机制

缓冲区注册

CUDA IPC (Interprocess Communication) 支持每个 GPU 节点拥有一个指向其他 GPU 节点内存的指针。显然,我们可以使用这些指针来完成 allreduce 操作。具体步骤是,首先在初始化的过程中就先将每个节点的一个 buffer 暴露给其他节点,组成一个 IPC handle,然后在做 allreduce 时,节点只需要从其他所有节点的 buffer 中读取数据即可。

one-shot allreduce

allreduce 有非常多算法。在小 size 场景下,为尽可能减少 GPU 同步和收发时间,我们当然希望直接了当一些:直接让所有节点的数据同时广播给其他节点。这就是 one-shot allreduce
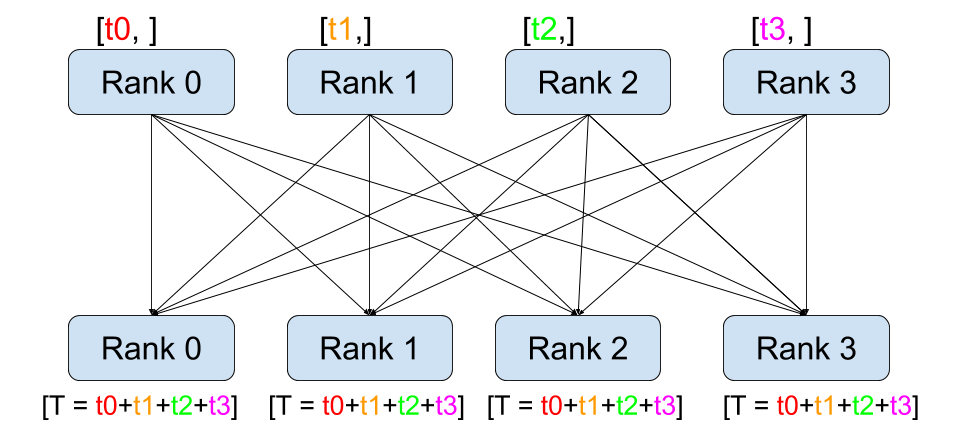
one-shot allreduce 的性能关键设计一个自定义对齐数据类型,方便让每个节点能都快速地读取 allreduce 数据。最好是 128 bits 对齐,因为每个 CUDA 线程一次会读取 16 字节,好让编译器生成 LD.128ST.128 指令。

two-hop allreduce

在稍微大一些的 size 或节点稍多的场景下,直接让所有节点广播就不太合适了。two-shot allreduce 先执行 reduce scatter,让每个节点从所有节点那读取对应的 1/N 的数据,然后加起来。然后,在做一个 allgather,将所有节点的数据发送给其他节点。

代码解读

本博文涉及的 vllm 代码为 0.6.3,请注意时效性。

python 开始

Linear 层到 allreduce

首先,让我们回到最初的地方,当多卡 TP 执行推理时,计算 MLP down_proj 等会涉及到了我们目前研究的 custom allreduce:

1
2
3
4
5
6
7
8
9
10
11
12
13
class RowParallelLinear(LinearBase):
def forward(self, input_):
# ...
bias_ = None if (self.tp_rank > 0 or self.skip_bias_add) else self.bias
output_parallel = self.quant_method.apply(self,
input_parallel,
bias=bias_)
if self.reduce_results and self.tp_size > 1:
output = tensor_model_parallel_all_reduce(output_parallel)
else:
output = output_parallel
# ...
return output, output_bias

该函数的实现在 vllm/distributed 内

1
2
3
4
5
6
7
8
9
10
11
12
def tensor_model_parallel_all_reduce(input_: torch.Tensor) -> torch.Tensor:
"""All-reduce the input tensor across model parallel group."""
return get_tp_group().all_reduce(input_)

def get_tp_group() -> GroupCoordinator:
assert _TP is not None, ("tensor model parallel group is not initialized")
return _TP

def all_reduce(self, input_: torch.Tensor) -> torch.Tensor:
# ...
# use custom allreduce
return torch.ops.vllm.outplace_all_reduce(input_, group_name=self.unique_name)

最终,经过几次辗转调用后,python 代码最终接入到 CustomAllreduce 类的地方就是:

1
2
3
4
def _all_reduce_out_place(self, input_: torch.Tensor) -> torch.Tensor:
ca_comm = self.ca_comm
out = ca_comm.custom_all_reduce(input_)
return out

allreduce 使用前提

现在,我们再来仔细看 CustomAllreduce

1
2
3
4
5
6
7
8
class CustomAllreduce:
_SUPPORTED_WORLD_SIZES = [2, 4, 6, 8]

# max_size: max supported allreduce size
def __init__(self,
group: ProcessGroup,
device: Union[int, str, torch.device],
max_size=8192 * 1024) -> None:

可以确定, Custom Allreduce 特性仅支持在 2,4,6,8 卡上推理时才能打开,并且最大支持的 allreduce size 为 8 MB。这里的 allreduce size 指的是 MLP 在各个 GPU 上计算出来的张量大小。

1
2
3
4
5
6
7
8
9
10
11
12
13
14
15
16
17
18
19
20
class CustomAllreduce:
# ...
def custom_all_reduce(self, input: torch.Tensor) -> Optional[torch.Tensor]:
if self.disabled or not self.should_custom_ar(input):
return None
if self._IS_CAPTURING:
if torch.cuda.is_current_stream_capturing():
return self.all_reduce_reg(input)
else:
# if warm up, mimic the allocation pattern
# since custom allreduce is out-of-place
return torch.empty_like(input)
else:
# note: outside of cuda graph context,
# custom allreduce incurs a cost of cudaMemcpy, which should
# be small(<=1% of overall latency) compared to the performance
# gains of using custom kernels
return self.all_reduce_unreg(input)

return None

若我们打开 custom allreduce 特性,custom_all_reduce 会先执行 should_custom_ar ,之后的逻辑可以分为三条

  • 一条是 self._IS_CAPTURING 为 True,使用 all_reduce_reg,在 CUDA graph capture 该 stream 流调用
  • 一条是 self._IS_CAPTURING 为 False,使用 all_reduce_unreg,在不是 CUDA graph 或者 CUDA graph 未 capture stream 流调用
  • 最后是 warm up 时的计算,可以忽略

先来看 should_custom_ar 来确定 allreduce 的使用前提:

  • 一条是 self._IS_CAPTURING 为 False,使用 all_reduce_unreg
  • 最后是 warm up 时的计算,可以忽略。

这两个函数 all_reduce 函数我们先按下不表,我们先来看 should_custom_ar 来确定 allreduce 的使用前提:

1
2
3
4
5
6
7
8
9
10
11
12
13
14
def should_custom_ar(self, inp: torch.Tensor):
if self.disabled:
return False
inp_size = inp.numel() * inp.element_size()
# custom allreduce requires input byte size to be multiples of 16
if inp_size % 16 != 0:
return False
if not is_weak_contiguous(inp):
return False
# for 4 or more non NVLink-capable GPUs, custom allreduce provides
# little performance improvement over NCCL.
if self.world_size == 2 or self.full_nvlink:
return inp_size < self.max_size
return False

不难发现,should_custom_ar 在如下条件会返回 False,allreduce 传输的 tensor 大小不是 16 对齐的,或者不是弱连续(连续或有前置偏移的连续),或者运行环境中有四张以上的非 NVLink 的 GPU 卡。

总结一下,Custom allreduce 特性在如下条件全部满足方可使用:

  • 用户没有手动 disable,即未传入 disable_custom_all_reduce=True
  • 机器上有 2,4,6,8 GPU 卡,且当有四张及以上的卡时,他们必须使用 NVLink 连接
  • allreduce 的张量大小不超过 8 MB,必须 16 Byte 对齐,必须满足连续条件

Python 到 C++

之前我们提到,vllm kernel 内的通信数据,是通过每个节点上的 CUDA IPC buffer 来交流实现的。本着怀疑主义的精神,我们来深入追踪一下,当前节点下的 CUDA 进程如何获得其他节点的 IPC buffer 的指针的。

其关键就藏匿于下面的代码中。

1
2
3
4
5
6
7
8
9
10
11
12
13
14
15
16
17
18
19
20
21
22
23
# buffers memory are owned by this Python class and passed to C++
# meta data composes of two parts: meta data for synchronization
# (256 bytes) and a temporary buffer for storing intermediate
# allreduce results.
self.meta = torch.zeros(ops.meta_size() + max_size,
dtype=torch.uint8,
device=self.device)
# This is a pre-registered IPC buffer. In eager mode, input tensors
# are first copied into this buffer before allreduce is performed
self.buffer = torch.empty(max_size,
dtype=torch.uint8,
device=self.device)
# This is a buffer for storing the tuples of pointers pointing to
# IPC buffers from all ranks. Each registered tuple has size of
# 8*world_size bytes where world_size is at most 8. Allocating 8MB
# is enough for 131072 such tuples. The largest model I've seen only
# needs less than 10000 of registered tuples.
self.rank_data = torch.empty(8 * 1024 * 1024,
dtype=torch.uint8,
device=self.device)
self.max_size = max_size
self.rank = rank
self.world_size = world_size

逐一地解释一下这些变量,因为它会在下面的篇幅中反复出现,准确地理解它对我们读懂 vllm custom allreduce 实现至关重要。

  • meta Python 类 owned 的 buffers,可以理解为整个 Python 类的所有字节,包括两部分,用于 GPU 间数据通信的 256 字节和用于暂存 allreduce 数据的 buffer
  • buffer 用于在该节点上的 CUDA IPC 的暂存数据的 buffer
  • rank_data 用于接受来自其他节点 CUDA IPC 数据的 buffer
  • rank 当前节点号
  • world_size 目前机器下的 GPU 总数

C++ CustomAllreduce

后续的指令做了非常重要的几件事,我们一个一个来看:

通过 CPU 广播所有节点的 IPC handles

1
2
3
4
5
handles, offsets = self._get_ipc_meta(self.meta)
self.full_nvlink = full_nvlink
self._ptr = ops.init_custom_ar(self.meta, self.rank_data, handles,
offsets, rank, self.full_nvlink)
self.register_buffer(self.buffer)

_get_ipc_meta 通过在 CPU 上调用 torch.distributed.broadcast_object_list 的广播手段,使得

  • handles 获得了所有其他节点的 ipc handler 指针
  • offsets 获得了ipc buffer 下接受来自其他节点数据的目标位置偏移量
1
2
3
4
5
6
7
def _get_ipc_meta(self, inp: torch.Tensor):
data = inp.untyped_storage()._share_cuda_()
shard_data = (
data[1], # ipc handle to base ptr
data[3], # offset of base ptr
)
return self._gather_ipc_meta(shard_data)

一开始我很是不能理解为什么 data[1] 和 data[3] 分别对应 ipc handle 和 offset ,后来我参考了 torch/csrc
/StorageSharing.cpp 的源码
才明白这其中的安排🤭。因为其中的 tuple 1 就是 cudaIpcMemHandle_t handle,3 就是真正 storage 的偏移量的字节数。

创建与初始化 C++ CustomAllreduce

ops.init_custom_ar 创建并初始化了 C++ CustomAllreduce

ops.init_custom_ar 通过 pytorch 的 TORCH_LIBRARY_EXPAND C++ 扩展(这是用于自定义算子的一个宏)来调用 backend 的 C++ 代码,也就是对应到了下面的 C++ 函数:

1
2
3
4
5
6
7
8
9
10
11
12
13
fptr_t init_custom_ar(torch::Tensor& meta, torch::Tensor& rank_data,
const std::vector<std::string>& handles,
const std::vector<int64_t>& offsets, int64_t rank,
bool full_nvlink) {
int world_size = offsets.size();
cudaIpcMemHandle_t ipc_handles[8];
for (int i = 0; i < world_size; i++) {
std::memcpy(&ipc_handles[i], handles[i].data(), sizeof(cudaIpcMemHandle_t));
}
return (fptr_t) new vllm::CustomAllreduce(
reinterpret_cast<vllm::Signal*>(meta.data_ptr()), rank_data.data_ptr(),
rank_data.numel(), ipc_handles, offsets, rank, full_nvlink);
}

上面的实现意思很简单,把之前从 CPU 广播拿到的 handles 放入到 CustomAllreduce 类内管理。

随后就是初始化 CustomAllreduce。该类内部的数组 sg_ 最多有 8 个 vllm::Signal 指针,他们分别指向所有 GPU 节点上 CustomAllreducemeta 内存(通过 CUDA IPC handles 和自己内部指针)。

而为了保证收发不会互相影响或产生死锁,vllm::Signal 将收发数组分开了:

1
2
3
4
5
constexpr int kMaxBlocks = 36;
struct Signal {
alignas(128) FlagType self_counter[kMaxBlocks][8];
alignas(128) FlagType peer_counter[2][kMaxBlocks][8];
};
1
2
3
4
5
6
7
8
9
10
11
12
13
14
15
16
17
18
19
20
CustomAllreduce(Signal* meta, void* rank_data, size_t rank_data_sz,
const cudaIpcMemHandle_t* handles,
const std::vector<int64_t>& offsets, int rank,
bool full_nvlink = true)
: rank_(rank), world_size_(offsets.size()),
full_nvlink_(full_nvlink), self_sg_(meta),
d_rank_data_base_(reinterpret_cast<RankData*>(rank_data)),
d_rank_data_end_(d_rank_data_base_ + rank_data_sz / sizeof(RankData)) {
for (int i = 0; i < world_size_; i++) {
Signal* rank_sg;
if (i != rank_) {
char* handle = open_ipc_handle(&handles[i]);
handle += offsets[i];
rank_sg = (Signal*)handle;
} else {
rank_sg = self_sg_;
}
sg_.signals[i] = rank_sg;
}
}

函数 open_ipc_handle 的实现可以参考 CUDA IPC API的使用说明。最后,返回的 char* handle 再加上之前获得的偏移量,就可以直接指向真正存放 storage 数据的内存位置了。

1
2
3
4
5
6
7
8
9
10
11
12
char* open_ipc_handle(const void* ipc_handle) {
auto [it, new_handle] =
ipc_handles_.insert({*((IPC_KEY*)ipc_handle), nullptr});
if (new_handle) {
char* ipc_ptr;
CUDACHECK(cudaIpcOpenMemHandle((void**)&ipc_ptr,
*((const cudaIpcMemHandle_t*)ipc_handle),
cudaIpcMemLazyEnablePeerAccess));
it->second = ipc_ptr;
}
return it->second;
}

注册 IPC buffer

register_buffer 函数完成了 CUDA IPC buffer 的注册。

下面的 C++ 代码会被执行。注意到在程序的最后是 buffer 完成注册最关键的一步:程序会将 handles + offset 全部都 copy 到 d_rank_data_base_ 指向的内存,结合 CustomAllreduce 的初始化过程,可以知道这就是将指向用于 allreduce 数据交换的内存的指针移动到了 rank_data 内。

程序最后的 buffers_ 则记录了一张表格,存放着本节点 bufferrank_data 的对应关系。这一步完成之后,本节点的 GPU 就可以通过 buffer 的指针,获知其他 GPU 的对应 buffer 的 IPC 交换地址,那这样也就完成了 register。

1
2
3
4
5
6
7
8
9
10
11
12
13
14
15
16
17
18
19
20
21
22
23
24
25
// here Tensor t is self.buffer in python
void register_buffer(fptr_t _fa, torch::Tensor& t,
const std::vector<std::string>& handles,
const std::vector<int64_t>& offsets) {
auto fa = reinterpret_cast<vllm::CustomAllreduce*>(_fa);
fa->register_buffer(handles, offsets, t.data_ptr());
}

void register_buffer(const std::vector<std::string>& handles,
const std::vector<int64_t>& offsets, void* self) {
check_rank_data_capacity();
RankData data;
for (int i = 0; i < world_size_; i++) {
if (i != rank_) {
char* handle = open_ipc_handle(handles[i].data());
handle += offsets[i];
data.ptrs[i] = handle;
} else {
data.ptrs[i] = self;
}
}
auto d_data = d_rank_data_base_++;
CUDACHECK(cudaMemcpy(d_data, &data, sizeof(RankData), cudaMemcpyHostToDevice));
buffers_[self] = d_data;
}

all_reduce_reg 与 all_reduce_unreg

明白了 CustomAllreduce 中的注册意义后,再来看之前提到的两个 all_reduce_(un)reg 函数就能更好地理解。

  • all_reduce_reg 在使用前就已经默认输入的 inp 已经完成注册;
  • all_reduce_unreg 则需要先将 inp 的数据拷贝到完成注册的 self.buffer,再做 allreduce。

所以,all_reduce_unreg 函数会多一次 cudaMemcpy,幸好这个数据拷贝损失的性能代价不大。它会在 CUDA graph context 外时被调用。

1
2
3
4
5
6
7
8
9
10
11
12
13
14
# all reduce, assuming inp tensor is IPC registered with register_buffer,
# or, in the context of cuda graphs, register_graph_buffers
def all_reduce_reg(self, inp: torch.Tensor, out: torch.Tensor = None):
if out is None:
out = torch.empty_like(inp)
ops.all_reduce_reg(self._ptr, inp, out)
return out

# all reduce, assuming inp tensor is NOT IPC registered
def all_reduce_unreg(self, inp: torch.Tensor, out: torch.Tensor = None):
if out is None:
out = torch.empty_like(inp)
ops.all_reduce_unreg(self._ptr, inp, self.buffer, out)
return out
1
2
3
4
5
6
7
8
9
10
void all_reduce_unreg(fptr_t _fa, torch::Tensor& inp, torch::Tensor& reg_buffer,
torch::Tensor& out) {
const at::cuda::OptionalCUDAGuard device_guard(device_of(inp));
auto stream = c10::cuda::getCurrentCUDAStream().stream();
auto input_size = inp.numel() * inp.element_size();
// async copy the inp to self.buffer
AT_CUDA_CHECK(cudaMemcpyAsync(reg_buffer.data_ptr(), inp.data_ptr(),
input_size, cudaMemcpyDeviceToDevice, stream));
_all_reduce(_fa, reg_buffer, out, stream);
}

简单起见,我们重点来看 all_reduce_unreg 这一个的实现,它将输入的 inp 数据拷贝给 self.buffer 后,就会调用 _all_reduce 函数来完成 allreduce。

allreduce 实现

_all_reduce 函数只是一个启动器,它会依照输入输出的数据类型启动 CustomAllreduce::allreduce 函数。接下来我们重点研究一下 allreduce 函数:

先来看其中的第一部分,该部分与之前的注册 IPC buffer 内容紧密相关。回顾前文,CustomAllreduce::buffers_ 内存放着本节点 bufferrank_data 的对应关系,于是获得的 ptrs 就是指向了 8 个 rank_data 内存的指针数组。当然,还有一种情况是不在当前上下文,那么需要从 d_rank_data_base_ 取出对应 rank_data 的指针数组。

1
2
3
4
5
6
7
8
9
10
11
12
13
14
15
16
17
template <typename T>
void allreduce(cudaStream_t stream, T* input, T* output, int size,
int threads = 512, int block_limit = 36) {
auto d = packed_t<T>::P::size;
// ...
RankData* ptrs;
cudaStreamCaptureStatus status;
CUDACHECK(cudaStreamIsCapturing(stream, &status));
if (status == cudaStreamCaptureStatusActive) {
ptrs = d_rank_data_base_ + graph_unreg_buffers_.size();
graph_unreg_buffers_.push_back(input);
} else {
auto it = buffers_.find(input);
if (it == buffers_.end())
throw std::runtime_error(...)
ptrs = it->second;
}

取出对应了其他节点 handle 指针后,下一步就是开始 Allreduce 操作了。下面的代码会分情况调用 cross_device_reduce_1stage 或者 cross_device_reduce_2stage。从代码看,对于小节点数小 size 的情况,会使用一阶段 allreduce cross_device_reduce_1stage,反之选择二阶段 cross_device_reduce_2stage

CUDA kernel 函数的 blocks 和 threads 是作者试验出来的,他在 A100,A10,A30 和 T4 上尝试了多次,最终选择 36 个 blocks 以获得最好的性能。

1
2
3
4
5
6
7
8
9
10
11
12
13
14
15
16
17
18
19
20
21
22
23
24
25
26
27
28
29
30
31
32
33
34
    size /= d;
auto bytes = size * sizeof(typename packed_t<T>::P);
int blocks = std::min(block_limit, (size + threads - 1) / threads);
#define KL(ngpus, name) \
name<T, ngpus><<<blocks, threads, 0, stream>>>(ptrs, sg_, self_sg_, output, \
rank_, size);
// TODO(hanzhi713): Threshold is different for A100 and H100.
// Add per device threshold.
#define REDUCE_CASE(ngpus) \
case ngpus: { \
if (world_size_ == 2) { \
KL(ngpus, cross_device_reduce_1stage); \
} else if (full_nvlink_) { \
if ((world_size_ <= 4 && bytes < 512 * 1024) || \
(world_size_ <= 8 && bytes < 256 * 1024)) { \
KL(ngpus, cross_device_reduce_1stage); \
} else { \
KL(ngpus, cross_device_reduce_2stage); \
} \
} \
break; \
}

switch (world_size_) {
REDUCE_CASE(2)
REDUCE_CASE(4)
REDUCE_CASE(6)
REDUCE_CASE(8)
default:
throw std::runtime_error(...)
}
#undef REDUCE_CASE
#undef KL
}

cross_device_reduce 实现

cross_device_reduce_1stage 代码实现如下:首先要保证所有的节点都在执行 allreduce 前同步,multi_gpu_barrier<ngpus, true>() 会首先将 vll::Signal 数组执行信号同步,随后同步 block 内线程。之所以用 vll::Signal 做信号同步,是因为代码中会出现两次 multi_gpu_barrier,为了防止节点间速度不一致导致的在不同 multi_gpu_barrier 函数上同步。比如若没有 vll::Signal,节点 1 在第二个 multi_gpu_barrier 同步,而节点 2 还未达到第一个 multi_gpu_barrier,然后他们同步后接着往下走,就会出现程序死锁或者 bug。

1
2
3
4
5
6
7
8
9
10
11
12
13
14
15
16
17
template <typename T, int ngpus>
__global__ void __launch_bounds__(512, 1)
cross_device_reduce_1stage(RankData* _dp, RankSignals sg, Signal* self_sg,
T* __restrict__ result, int rank, int size) {
using P = typename packed_t<T>::P;
using A = typename packed_t<T>::A;
// note: we don't reorder the address so the accumulation order is the same
// for all ranks, ensuring bitwise identical results
auto dp = *_dp;
multi_gpu_barrier<ngpus, true>(sg, self_sg, rank);
// do the actual reduction
for (int idx = blockIdx.x * blockDim.x + threadIdx.x; idx < size;
idx += gridDim.x * blockDim.x) {
((P*)result)[idx] = packed_reduce<P, ngpus, A>((const P**)&dp.ptrs[0], idx);
}
multi_gpu_barrier<ngpus, false>(sg, self_sg, rank);
}

对于 two-shot allreduce,执行步骤会稍显复杂。首先,程序将每个节点的数据分成了 ngpus 份,然后按照节点 rank 号分配好指针位置,再将数据通过 reduce 的方式求和存入到 tmp 数组中。经过第二个 multi_gpu_barrier 后,执行 allgather,第 i part 部分的数据会从第 i 个节点过来,所以 i 号节点需要遍历 ngpus 遍,将其他节点的数据都 gather 起来。

1
2
3
4
5
6
7
8
9
10
11
12
13
14
15
16
17
18
19
20
21
22
23
24
25
26
27
28
29
30
31
32
33
34
35
36
37
38
39
40
template <typename T, int ngpus>
__global__ void __launch_bounds__(512, 1)
cross_device_reduce_2stage(RankData* _dp, RankSignals sg, Signal* self_sg,
T* __restrict__ result, int rank, int size) {
int tid = blockIdx.x * blockDim.x + threadIdx.x;
int stride = gridDim.x * blockDim.x;
using P = typename packed_t<T>::P;
using A = typename packed_t<T>::A;
int part = size / ngpus;
int start = rank * part;
int end = rank == ngpus - 1 ? size : start + part;
int largest_part = part + size % ngpus;
const P* ptrs[ngpus];
P* tmps[ngpus];
#pragma unroll
for (int i = 0; i < ngpus; i++) {
int target = (rank + i) % ngpus;
ptrs[i] = (const P*)_dp->ptrs[target];
tmps[i] = get_tmp_buf<P>(sg.signals[target]);
}
auto tmp_out = tmps[0];
multi_gpu_barrier<ngpus, true>(sg, self_sg, rank);
// stage 1: reduce scatter
for (int idx = start + tid; idx < end; idx += stride) {
tmp_out[idx - start] = packed_reduce<P, ngpus, A>(ptrs, idx);
}
multi_gpu_barrier<ngpus, false, true>(sg, self_sg, rank);

// stage 2: allgather
for (int idx = tid; idx < largest_part; idx += stride) {
#pragma unroll
for (int i = 0; i < ngpus; i++) {
int gather_from_rank = ((rank + i) % ngpus);
if (gather_from_rank == ngpus - 1 || idx < part) {
int dst_idx = gather_from_rank * part + idx;
((P*)result)[dst_idx] = tmps[i][idx];
}
}
}
}

倘若你理解了前文所说 one-shot allreduce 和 two-shot allreduce 的实现原理,那么上面部分的 CUDA 代码实现其实非常简单,但难在如何写出高性能的代码。本着学习的态度,我仔细研究并总结了以下优化细节:

  • packed_t 中对齐 128 bits 的实现。有利于线程更快 load 数据

    1
    2
    3
    4
    5
    6
    7
    8
    9
    10
    11
    12
    13
    14
    template <typename T, int sz>
    struct __align__(alignof(T) * sz) array_t {
    T data[sz];
    using type = T;
    static constexpr int size = sz;
    };

    template <typename T>
    struct packed_t {
    // the (P)acked type for load/store
    using P = array_t<T, 16 / sizeof(T)>;
    // the (A)ccumulator type for reduction
    using A = array_t<float, 16 / sizeof(T)>;
    };
  • 嵌入 cuda ptx 代码

    1
    2
    3
    4
    5
    6
    7
    8
    9
    10
    11
    static DINLINE void st_flag_volatile(FlagType* flag_addr, FlagType flag) {
    asm volatile("st.volatile.global.u32 [%1], %0;" ::"r"(flag), "l"(flag_addr));
    }

    static DINLINE FlagType ld_flag_volatile(FlagType* flag_addr) {
    FlagType flag;
    asm volatile("ld.volatile.global.u32 %0, [%1];"
    : "=r"(flag)
    : "l"(flag_addr));
    return flag;
    }
  • 使用低精度做计算,后转到高精度 float

    1
    2
    3
    4
    5
    6
    7
    8
    9
    template <typename P, int ngpus, typename A>
    DINLINE P packed_reduce(const P* ptrs[], int idx) {
    A tmp = upcast(ptrs[0][idx]);
    #pragma unroll
    for (int i = 1; i < ngpus; i++) {
    packed_assign_add(tmp, upcast(ptrs[i][idx]));
    }
    return downcast<P>(tmp);
    }
  • 循环充分展开,比如

    1
    2
    3
    4
    5
    6
    7
    8
    9
    #pragma unroll
    for (int i = 0; i < ngpus; i++) {
    int gather_from_rank = ((rank + i) % ngpus);
    if (gather_from_rank == ngpus - 1 || idx < part) {
    int dst_idx = gather_from_rank * part + idx;
    ((P*)result)[dst_idx] = tmps[i][idx];
    }
    }
    }

VLLM custom allreduce 实现
https://dingfen.github.io/2024/08/02/2024-10-30-vllm/
作者
Bill Ding
发布于
2024年8月2日
更新于
2024年11月10日
许可协议