更新于:2024-08-26T18:27:47+08:00
THUDM/ChatGLM代码细读
ChatGLM 是什么
ChatGLM-6B 是一个基于 General Language Model (GLM) 架构的开源、支持中英双语的对话语言模型。
清华大学团队和智谱AI可以说浑身是肝,发布了许多大模型:
ChatGLM2-6B
更强大的性能:升级了 ChatGLM2-6B 的基座模型。ChatGLM2-6B 使用了 GLM 的混合目标函数,经过了 1.4T 中英标识符的预训练与人类偏好对齐训练,评测结果显示,相比于初代模型,ChatGLM2-6B 在 MMLU(+23%)、CEval(+33%)、GSM8K(+571%) 、BBH(+60%)等数据集上的性能取得了大幅度的提升,在同尺寸开源模型中具有较强的竞争力。
更长的上下文:使用 FlashAttention 技术将基座模型的上下文长度(Context Length)由 ChatGLM-6B 的 2K 扩展到了 32K,并在对话阶段使用 8K 的上下文长度训练。对于更长的上下文,我们发布了 ChatGLM2-6B-32K 模型。LongBench 的测评结果表明,在等量级的开源模型中,ChatGLM2-6B-32K 有着较为明显的竞争优势。
更高效的推理:使用 Multi-Query Attention 技术获得了更快的推理速度和更低的显存占用:在官方的模型实现下,推理速度相比初代提升了 42%,INT4 量化下,6G 显存支持的对话长度由 1K 提升到了 8K。
ChatGLM3
更强大的基础模型: ChatGLM3-6B 的基础模型 ChatGLM3-6B-Base 采用了更多样的训练数据、更充分的训练步数和更合理的训练策略。在语义、数学、推理、代码、知识等不同角度的数据集上测评显示,ChatGLM3-6B-Base 具有在 10B 以下的基础模型中最强的性能 。
更完整的功能支持: ChatGLM3-6B 采用了全新设计的 Prompt 格式 ,除正常的多轮对话外。同时原生支持工具调用(Function Call)、代码执行(Code Interpreter)和 Agent 任务等复杂场景。
更全面的开源序列: 除了对话模型 ChatGLM3-6B 外,还开源了基础模型 ChatGLM3-6B-Base 、长文本对话模型 ChatGLM3-6B-32K。
此外,还有以下模型,我不再详细介绍:
ChatGLM 架构
ChatGLM2 的架构如下图所示。可以看出来,与 llama 等其他基于 transformer 的模型没什么不同:
ChatGLM2 代码详解
因工作原因,先做 ChatGLM2 代码的分析,其模型的 config 数据如下:
1
2
3
4
5
6
7
8
9
10
11
12
13
14
15
16
17
18
19
20
21
22
23
24
25
26
27
28
29
30
31
32
{ "_name_or_path" : "THUDM/chatglm2-6b" , "add_bias_linear" : false , # 是否在线性层添加偏移项,否"add_qkv_bias" : true , # 是否添加 qkv 层的偏移项,是"apply_query_key_layer_scaling" : true , # 是否对 qkv 层进行缩放,是"apply_residual_connection_post_layernorm" : false , # 是否在残差连接后进行层归一化,否"attention_dropout" : 0.0 , # attention dropout 值,0 "attention_softmax_in_fp32" : true , # 是否在 fp32 下计算 softmax,是"bias_dropout_fusion" : true , # 是否融合 bias dropout,是"ffn_hidden_size" : 13696 , # ffn 层的隐藏层大小,13696 "fp32_residual_connection" : false , # 是否在 fp32 下进行残差连接,否"hidden_dropout" : 0.0 , # hidden dropout 值,0 "hidden_size" : 4096 , # 隐藏层大小,4096 "kv_channels" : 128 , # kv 张量的通道数,128 "layernorm_epsilon" : 1e-05 , # layernorm 层的最小值,1e-05 "multi_query_attention" : true , # 是否使用多查询注意力,是"multi_query_group_num" : 2 , # 多查询注意力的组数,2 "num_attention_heads" : 32 , # 注意力头数,32 "num_layers" : 28 , # transformer层数,28 "original_rope" : true , # 是否使用原生 RoPE,是"padded_vocab_size" : 65024 , # 填充后的词表大小,65024 "post_layer_norm" : true , # 是否在 transformer 层后进行层归一化,是"rmsnorm" : true , # 是否使用 RMSNorm,是"seq_length" : 32768 , # 支持的最长序列长度,32768 "use_cache" : true , # 是否使用 KV cache,是"torch_dtype" : "float16" , # 模型的精度,float16"transformers_version" : "4.27.1" , # transformers 版本,4.27 .1 "tie_word_embeddings" : false , # 是否对词嵌入进行绑定,否"eos_token_id" : 2 , # 句子结束符 id,2 "pad_token_id" : 0 # 填充符 id,0 }
ChatGLM 基件
与先前的llama博客 套路一样,我们从底到顶,先从最基础的基件部分代码开始,一步步往上走,从而逐步理解整个模型的架构。
PrefixEncoder
PrefixEncoder 是一个前缀编码器,ChatGLM 模型使用它对历史输入的文本序列进行嵌入编码。从源码中可知,该类结构随用户配置的 config.prefix_projection 而变化,如果为 True,则使用一个两层的 MLP 进行编码,否则直接使用 Embedding 层进行编码。Embedding 层的规模是 config.pre_seq_len,之前的文本长度,每个词的嵌入向量维度是 config.num_layers * config.kv_channels * config.multi_query_group_num * 2 = 28 * 128 * 2 * 2 = 14336。而加的两层 MLP 则是将其降维到 config.hidden_size,其 MLP 内部的参数可以存储更多的权重信息。
1
2
3
4
5
6
7
8
9
10
11
12
13
14
15
16
17
18
19
20
21
22
23
24
25
26
27
28
29
30
class PrefixEncoder (torch.nn.Module):""" The torch.nn model to encode the prefix Input shape: (batch-size, prefix-length) Output shape: (batch-size, prefix-length, 2*layers*hidden) """ def __init__ (self, config: ChatGLMConfig ):super ().__init__()if self.prefix_projection:2 else :2 )def forward (self, prefix: torch.Tensor ):if self.prefix_projection:else :return past_key_values
RotaryEmbedding
旋转位置编码的原理在先前的llama博客 中已经介绍过。但 apply_rotary_pos_emb 实现有所不同。先放几行公式供读者参考回忆:
θ i = 1000 0 − 2 ( i − 1 ) / d , i ∈ [ 1 , 2 , . . . , d / 2 ] \theta_i = 10000^{-2(i-1)/d}, i \in [1,2,...,d/2]
θ i = 1000 0 − 2 ( i − 1 ) / d , i ∈ [ 1 , 2 , ... , d /2 ]
结合前后代码,rope_cache 是 ChatGLM 模型的 RotaryEmbedding 存储的 cos sin cache。其最低维中,0 存储了 cos 值,1 存储了 sin 值,所以 apply_rotary_pos_emb 的 9-15 行出现了一个令人费解的复杂公式。
1 2 3 4 5 6 7 8 9 128 2 , original_impl=config.original_rope, device=device,1.0 / (base ** (torch.arange(0 , n_elem, 2 , dtype=dtype, device=device) / n_elem))float ()1 )
apply_rotary_pos_emb 将 query tensor 最低维拆成两半,前半部分参与运算,张量是 x: Shape[seq_len, bsz, num_heads, dim//2, 2] 和 rope cache: Shape[seq_len, bsz, 1, dim//2, 2],可见 cache 的第二维会进行 broadcast,随后将结果的三四维 flatten,变为 Shape[seq_len, bsz, num_heads, dim//2],并连接上 query tensor 的后半部。
1
2
3
4
5
6
7
8
9
10
11
12
13
14
15
16
17
18
def apply_rotary_pos_emb (x: torch.Tensor, rope_cache: torch.Tensor ) -> torch.Tensor:0 ), x.size(1 ), x.size(2 ), x.size(3 )2 ] * 2 1 , np, rot_dim // 2 , 2 )1 , 1 , xshaped.size(3 ), 2 )0 ] * rope_cache[..., 0 ] - xshaped[..., 1 ] * rope_cache[..., 1 ],1 ] * rope_cache[..., 0 ] + xshaped[..., 0 ] * rope_cache[..., 1 ],1 ,3 )return torch.cat((x_out2, x_pass), dim=-1 )
读者可能觉得奇怪,为何前半部分的 query 参与了运算,后半部分的 query 直接就连接到后面了?事实上我一开始在读这一代码时认为这是个bug,知乎上也有人发现了这一点 ,但经他人提醒,认为这是一个 trick 🤯。但其底层原理是啥我不太清楚了。
RMSNorm
RMSNorm 归一层的作用和原理也在先前的llama博客 中已经介绍过,仅列出相应的公式:$ RMS(a) = \sqrt{\frac{1}{n}\sum_i^n{a_i^2}} , , ,
Attention
ChatGLM 模型的核心是 Attention 机制,其实现与 llama-2 相比有很大不同,但其架构是相似的。仍然是在实现如下公式计算:
s o f t m a x ( Q K T d k ) V softmax(\frac{QK^T}{\sqrt{d_k}})V
so f t ma x ( d k Q K T ) V
但从实现上看,我总结了以下几点不同:
有两个类实现 attention 机制,SelfAttention 和 CoreAttention 类。
参与运算的张量维度不同。ChatGLM2 实现与主流的张量维度不同,其 query 张量的维度是 (seq_len, batch_size, num_heads, head_dim),而一般而言张量的维度是 (batch_size, num_heads, seq_len, head_dim)。这导致代码比较繁琐难懂,我也不理解为何实现要与主流相悖。
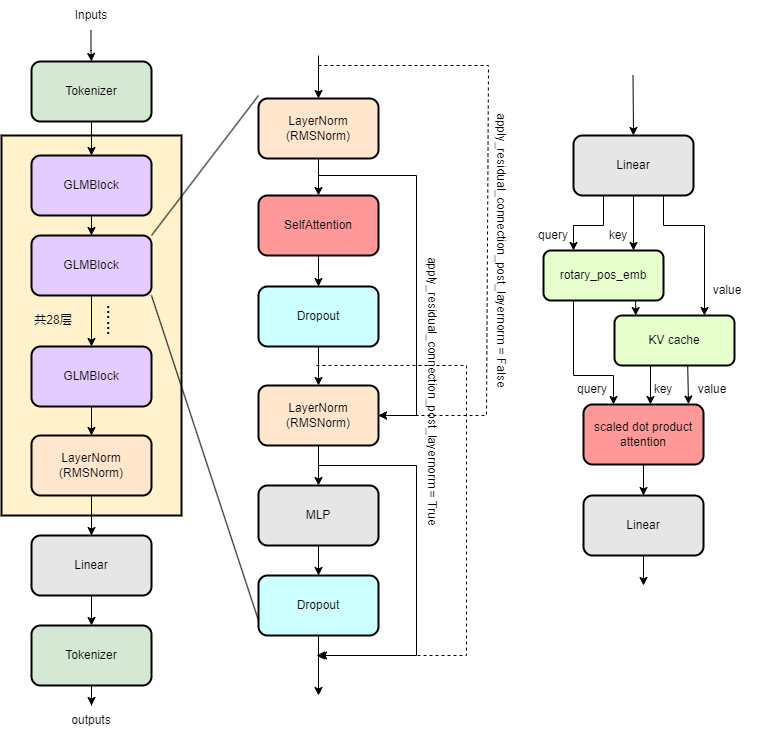
现在,我们来看类 CoreAttention 的具体实现:ChatGLM2 模型的 transform 层中,Multi-Head Attention 有 32 个头,每个头的维度为 128,并且使用了 Grouped-Query Attention 优化技术,将 KV 张量分成了两组,减少权重的内存开销。特别注意到,与 llama 不同的是,ChatGLM2 模型打开了 query_key_layer_scaling,从代码实现上看,层号 layer_number 越大,coeff 越大,因此,norm_factor 也会随之增大。此外,还启用了注意力的 dropout 层。
1
2
3
4
5
6
7
8
9
10
11
12
13
14
15
16
17
18
19
20
21
22
23
24
25
class CoreAttention (torch.nn.Module):def __init__ (self, config: ChatGLMConfig, layer_number ):super (CoreAttention, self).__init__()if self.apply_query_key_layer_scaling:True max (1 , layer_number)None if self.apply_query_key_layer_scaling:
torch>=2.0 有针对 Attention 机制的优化接口 nn.functional.scaled_dot_product_attention,因此,ChatGLM2 模型直接使用了该接口。由于上文所说的第一个不同点,在使用接口前,第四行 会对 QKV 张量进行重排。调用完接口后,还要将结果重排回去,得到最终的输出。但令人费解的是,之前说的 query_key_layer_scaling 以及 dropout 层的特性好像对 torch>=2.0 不起作用 🤔(因为代码里压根没用上它们)。
至于 torch-1 的对注意力机制的裸实现,emmm,代码太过复杂,就算花时间去理解也是白费功夫。总而言之,CoreAttention 类围绕着 torch-2 的 SDPA 接口包装了一下,就完事了。
1
2
3
4
5
6
7
8
9
10
11
12
13
14
15
16
17
def forward (self, query_layer, key_layer, value_layer, attention_mask ):int (torch.__version__.split('.' )[0 ])if pytorch_major_version >= 2 :1 , 2 , 0 , 3 ) for k in [query_layer, key_layer, value_layer]]if attention_mask is None and query_layer.shape[2 ] == key_layer.shape[2 ]:True )else :if attention_mask is not None :2 , 0 , 1 , 3 )2 ] + (self.hidden_size_per_partition,)else :pass
再来看 SelfAttention 的实现,SelfAttention 类包含了三个组成成分:一)将输入张量转换成 QKV 张量的线性层,二)CoreAttention 类,实现注意力计算。三)将 CoreAttention 的 SDPA 结果转换成输出张量的线性层。其中,线性层的输入维度是 config.hidden_size,输出维度是 config.projection_size。
1
2
3
4
5
6
7
8
9
10
11
12
13
14
15
16
17
18
19
20
21
22
23
24
25
26
27
28
class SelfAttention (torch.nn.Module):"""Parallel self-attention layer abstract class. Self-attention layer takes input with size [s, b, h] and returns output of the same size. """ def __init__ (self, config: ChatGLMConfig, layer_number, device=None ):super (SelfAttention, self).__init__()max (1 , layer_number)3 * self.projection_sizeif self.multi_query_attention:2 * self.hidden_size_per_attention_head * config.multi_query_group_numor config.add_qkv_bias,
其 forward 函数的运算过程也可以分成三部分:
准备 QKV 张量。输入张量 hidden_states 经过线性层后,得到 QKV 混合张量,随后拆分:mixed_x_layer 的最后一维度是 hidden_size + 2 * KV_dim,因为使用了 Grouped-Query Attention 优化技术后,Key Value 张量的头数变少了。对应地,7-9 行也是按照 hidden_size + 2 * KV_dim 拆分出 QKV 张量。
1
2
3
4
5
6
7
8
9
10
11
12
13
14
15
16
17
18
19
20
21
22
23
24
def forward ( self, hidden_states, attention_mask, rotary_pos_emb, kv_cache=None , use_cache=True if self.multi_query_attention:1 ,
将 QKV 张量转变为 Shape[sq, b, np, hn]
1
2
3
4
5
6
7
8
9
10
11
12
query_layer = query_layer.view(1 ] + (self.num_attention_heads_per_partition, self.hidden_size_per_attention_head)1 ] + (self.num_multi_query_groups_per_partition, self.hidden_size_per_attention_head)1 ]else :
准备 RoPE,和 KV cache。QKV 先加入旋转位置编码,再连接上之前的 KV cache 张量。
1 2 3 4 5 6 7 8 9 10 11 12 13 14 if rotary_pos_emb is not None :if kv_cache is not None :0 )0 )if use_cache:else :None
Grouped-Query Attention 使得 KV 张量的数量只有 num_multi_query_groups_per_partition(两个),但却要对应 num_attention_heads_per_partition 个 Query,因此代码最后要将 KV 张量使用 torch.expand 将第三维扩展。
1
2
3
4
5
6
7
8
9
10
11
12
13
14
15
if self.multi_query_attention:2 )1 , -1 , -1 , self.num_attention_heads_per_partition // self.num_multi_query_groups_per_partition, -1 2 ] + (self.num_attention_heads_per_partition, self.hidden_size_per_attention_head)2 )1 , -1 , -1 , self.num_attention_heads_per_partition // self.num_multi_query_groups_per_partition, -1 2 ] + (self.num_attention_heads_per_partition, self.hidden_size_per_attention_head)
执行注意力计算和最后的输出线性层计算,这里的代码就很简单了。
1 2 3 4 5 6 7 8 9 10 11 12 13 return output, kv_cache
MLP
ChatGLM2 的 MLP 层与 llama 的略有不同。但都有两层全连接层,以及中间的激活层 swiglu。代码比较平凡,就不细说了。
ChatGLM2 中间件
ChatGLM2 中间件的核心是 GLMBlock,GLMBlock 包含了三个组成成分:一)在注意力前后的 LayerNorm 层,二)注意力层,三)在最后的 MLP 层:
1
2
3
4
5
6
7
8
9
10
11
12
13
14
15
16
17
18
19
20
21
22
class GLMBlock (torch.nn.Module):"""A single transformer layer. Transformer layer takes input with size [s, b, h] and returns an output of the same size. """ def __init__ (self, config: ChatGLMConfig, layer_number, device=None ):if config.rmsnorm else LayerNorm
多个 GLMBlock 堆叠起来,组成一个 GLMTransformer 层。GLMTransformer 层的最后还会额外附上一层 LayerNorm,这部分代码平凡。
GLMBlock 的 forward 函数很好地描述了 GLMBlock 架构以及数据流向:先是 layernorm 层,再是注意力层,旁路使用残差结构,随后跟上 dropout 层和 Layernorm 层,最后是 MLP 层和 dropout 层,这些数据通路在之前的 ChatGLM2 架构图上描绘得很清楚,读者可参见代码 。
GLMTransformer 类则是将若干个 GLMBlock 做堆叠封装,并在网络的最后加入一层 layernorm 层。其 forward 函数中包含了 checkpoint 相关的代码👇,之前在 llama 详解的博客 中我们提到过,使用 gradient_checkpointing 可以有效节约显存,因为前推时程序不保存中间计算值。而 use_cache 是通过消耗空间换时间。因此若 gradient_checkpointing 和 use_cache 都打开,那么两者可能会互相抵消优化影响,故模型不支持两者同时为 True。
1
2
3
4
5
6
7
8
9
10
11
12
13
14
15
def forward ( self, hidden_states, attention_mask, rotary_pos_emb, kv_caches=None , use_cache: Optional [bool ] = True , output_hidden_states: Optional [bool ] = False , if not kv_caches:None for _ in range (self.num_layers)]if use_cache else None if self.gradient_checkpointing and self.training:if use_cache:"`use_cache=True` is incompatible with gradient checkpointing. Setting `use_cache=False`..." False
ChatGLM2 Model
ChatGLMPreTrainedModel 类是一个基抽象类,负责处理 mask 和 position_id 等。ChatGLMModel 继承了它,ChatGLMModel 能囊括了 GLMTransformer 类,以及输出层 output layer;增加了对输入 input_ids 使用 torch.nn.Embedding 嵌入编码,以及对历史对话使用 PrefixEncoder 编码的环节等。
ChatGLMPreTrainedModel
处理 position_id:根据输入的 input_ids 的形状:(batch_size, seq_len),每个batch都从零开始递增标号:
1
2
3
4
5
def get_position_ids (self, input_ids, device ):0 ).repeat(batch_size, 1 )return position_ids
处理 mask:attention mask 应当是一个下三角矩阵,
1
2
3
4
5
6
7
8
9
10
11
12
13
14
15
16
17
18
19
20
def get_masks (self, input_ids, past_key_values, padding_mask=None ):if past_key_values:0 ][0 ].shape[0 ]if past_length:1 )if padding_mask is not None :1 )if not past_length and padding_mask is not None :1 ) - 1 0.5 ).bool ()1 )return full_attention_mask
ChatGLMForConditionalGeneration 类和 ChatGLMForSequenceClassification 类是用户(指 transformer框架)真正调用到的模型,他们俩内部都包含了 ChatGLMModel 类。
从架构层面看,ChatGLMForConditionalGeneration 在 ChatGLM 模型的最后上增加了损失函数 CrossEntropyLoss,以便训练;而 ChatGLMForSequenceClassification 类则在最后增加了一个线性层和 dropout 层用于 sequence classification,当然该类最后也会调用损失函数 CrossEntropyLoss 和 BCEWithLogitsLoss。
在用户与大模型发生交谈时,ChatGLM 模型会使用 transformer 架构下控制 token 生成的工具:logits processor。它可以通过控制 logits 概率,改变大模型吐出的 token。一个很常用的场景是控制大模型不吐出“敏感词”,可以加一个敏感词列表,让大模型在吐出该词前换一个词或者干脆不产生敏感词。这篇博客 里介绍了自定义 LogitsProcessor 的方法。
总结
至此,我有详有略地给大家展示了 chatglm2 模型的架构和代码实现。总的来说,该模型架构基本相似于其他主流的大模型。在看过 llama 模型的具体实现后,chatglm2 给我一种很熟悉又陌生的感觉。熟悉在于其架构和数据通路层面的相似感,而陌生在于 chatglm2 模型在具体计算注意力时采用了不同寻常的张量形状,不仅与其他大模型相异,也与 torch 的注意力函数接口不同。
从使用体验上说,ChatGLM2 是一款非常不错的中英文对话大模型,几轮对话下来基本符合预期。其6B的大小对新手和个人玩家友好,值得有条件的各位试试😄。