更新于:2024-04-09T23:21:20+08:00
huggingface下llama代码细读(下)
前言
上篇博客我们重点介绍了 llama 模型,并讨论了它的架构、基件和中间件等。碍于篇幅关系,我将 transformer llama 的代码解读下半部分移动到了本篇博客中,要想从头开始的读者们可以参考这篇博客 。
llama 模型
译码层
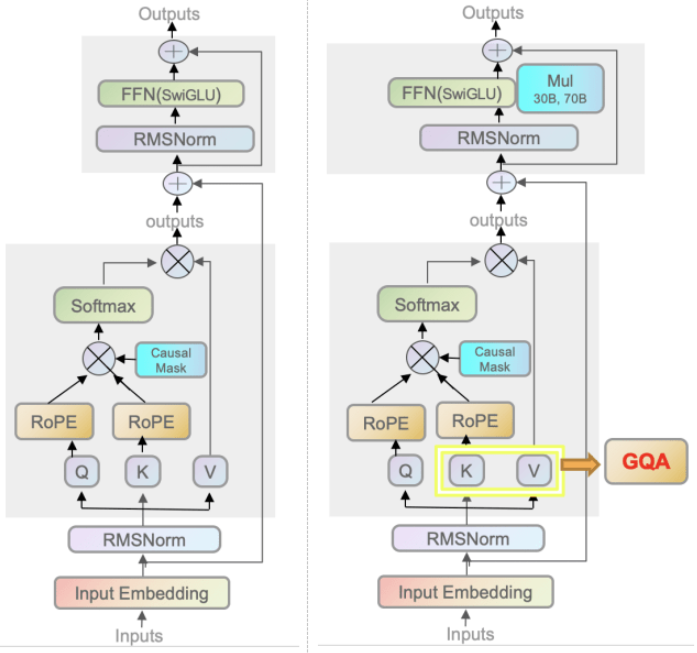
在了解了构成 llama 的基本组件后,要如何搭建起大模型的“高楼大厦”?当然不能一步登天,而要步步为营。在大模型推理阶段,输入的文本序列会经过多个译码层,执行自注意力等运算。译码层由 LlamaDecoderLayer 类表示,它将 LlamaAttention LlamaRMSNorm 等基件组合起来。上图所展示的架构就是一个译码层的架构。
1
2
3
4
5
6
7
8
9
10
11
12
class LlamaDecoderLayer (nn.Module):def __init__ (self, config: LlamaConfig ):super ().__init__()if not getattr (config, "_flash_attn_2_enabled" , False )else LlamaFlashAttention2(config=config)
上面的构造函数罗列了译码层的几个组件:自注意力层,MLP 层和两个 RMSNorm 层,而其 forward 函数则更详细地展示了架构图内张量的执行情况:13 行先将输入执行一次 RMSNorm 归一,16-25 行执行一次注意力运算,加上了残差结构,再执行一次 RMSNorm 归一,27-33 行将注意力结果输出到 MLP 中,最后返回结果👇。
1
2
3
4
5
6
7
8
9
10
11
12
13
14
15
16
17
18
19
20
21
22
23
24
25
26
27
28
29
30
31
32
33
34
35
36
37
38
39
40
41
42
def forward ( self, hidden_states: torch.Tensor, attention_mask: Optional [torch.Tensor] = None , position_ids: Optional [torch.LongTensor] = None , past_key_value: Optional [Tuple [torch.Tensor]] = None , output_attentions: Optional [bool ] = False , use_cache: Optional [bool ] = False , **kwargs, Tuple [torch.FloatTensor, Optional [Tuple [torch.FloatTensor, torch.FloatTensor]]]:if output_attentions:if use_cache:return outputs
llama Model
LlamaModel 由上面介绍的多个 LlamaDecoderLayer 堆叠而成。以之前的 llama-7b-hf 参数为例,num_hidden_layers 为32,意思是该模型一共堆叠了 32 层译码层。
1
2
3
4
5
6
7
8
9
10
11
12
13
14
{ "architecture" : [ "LlamaForCausalLM" ] , "hidden_act" : "silu" , "hidden_size" : 4096 , "initializer_range" : 0.02 , "intermediate_size" : 11008 , "max_position_embeddings" : 4096 , "model_type" : "llama" , "num_attention_heads" : 32 , "num_hidden_layers" : 32 , "num_key_value_heads" : 32 , "pretraining_tp" : 2 , "rms_norm_eps" : 1e-05 , }
除此之外,Llama 模型在输入的最前头加入了一个嵌入层(Embedding),最后又加了一层 RMSNorm 进行归一,下面是它的构造函数:
1
2
3
4
5
6
7
8
9
10
11
12
13
14
15
16
17
class LlamaModel (LlamaPreTrainedModel ):""" Transformer decoder consisting of *config.num_hidden_layers* layers. Each layer is a [`LlamaDecoderLayer`] """ def __init__ (self, config: LlamaConfig ):super ().__init__(config)for _ in range (config.num_hidden_layers)])False
LlamaModel 类继承自 LlamaPreTrainedModel,LlamaPreTrainedModel 没有那么神秘,只不过是在 LlamaDecoderLayer 的基础上包裹了一些初始化操作而已:
1
2
3
4
5
6
7
8
9
10
11
12
13
14
15
16
17
18
class LlamaPreTrainedModel (PreTrainedModel ):"model" True "LlamaDecoderLayer" ]"past_key_values" True def _init_weights (self, module ):if isinstance (module, nn.Linear):0.0 , std=std)if module.bias is not None :elif isinstance (module, nn.Embedding):0.0 , std=std)if module.padding_idx is not None :
Llama 模型的推理过程
我们从 LlamaModel 代码中已经了解到,Llama 模型将 32 层译码层堆叠起来,输入的文本序列经过一层层译码被最终转化成输出序列。而 LlamaModel::forward 作为整个大模型“未封装的”入口,显得尤为重要。
参数一览
既然是个入口,我们首先从它的参数入手:
1
2
3
4
5
6
7
8
9
10
11
12
def forward ( self, input_ids: torch.LongTensor = None , attention_mask: Optional [torch.Tensor] = None , position_ids: Optional [torch.LongTensor] = None , past_key_values: Optional [List [torch.FloatTensor]] = None , inputs_embeds: Optional [torch.FloatTensor] = None , use_cache: Optional [bool ] = None , output_attentions: Optional [bool ] = None , output_hidden_states: Optional [bool ] = None , return_dict: Optional [bool ] = None , ) -> Union [Tuple , BaseModelOutputWithPast]:
input_ids 可简单理解为输入的文本序列
attention_mask 注意力掩码,1 表示未遮掩,0 表示遮掩。通常会使用下三角矩阵对输出进行遮盖,防止模型作弊。
position_ids 输入文本序列的位置编号,从 0 开始
past_key_values 若 use_cache 为真则之前的kv值会被用于加速推理
inputs_embeds 模型支持直接传入 input 的嵌入张量,代替 input_ids
use_cache 是否使用 KV cache 加速推理,通过使用 cache 缓存权重等值加速推理
output_attentions 是否要返回所有注意力层的注意力张量
output_hidden_states 是否要返回所有层的隐藏层状态张量
return_dict 指示返回的类型是 ~utils.ModelOutput 还是 tuple
masked Attention
接下来看看 forward 的实现。略去错误机制和其他准备过程,来看看神秘的 attention_mask 如何被准备的。回顾一下 transformers 机制里的注意力掩码,它是用来在训练和推理时遮挡后续部分的输出,防止模型看到未来的输出而“作弊”用的。从公式的角度看,$ MaskAttn=softmax(\frac{QK^T}{\sqrt{d_k}}+masked)V $ ,公式的前半部分主要在计算注意力矩阵,而 V V V V V V
这点从代码中也可以得到验证,在此不得不感慨代码更新速度之快:现在最新版本的 transformers 代码使用 _prepare_4d_causal_attention_mask,而 4.37 之前的版本使用的函数还是 _expand_mask、_make_causal_mask 🙌:
input_ids 是我们输入的文本矩阵,维度通常是 (batch_size, seq_len)。因此代码前四行也是如此提取出 batch_size 和 seq_len 的。position_ios 给我们输入的文本单词从 0 或 past_key_values_length 开始编号。随后,15 行将 input_ids 推入嵌入层,推理正式开始。
1 2 3 4 5 6 7 8 9 10 11 12 13 14 15 16 17 18 19 20 21 22 23 24 25 26 27 28 is not None :2 ]elif inputs_embeds is not None :2 ]0 ][0 ].shape[2 ]if position_ids is None :0 )if inputs_embeds is None :if getattr (self.config, "_flash_attn_2_enabled" , False ):if (attention_mask is not None and 0 in attention_mask) else None else :
再之后,代码开始使用库内函数准备注意力掩码了,行,那就让我们看看 _prepare_4d_causal_attention_mask 函数里到底卖的什么药:
1
2
3
4
5
6
7
8
9
10
11
12
13
14
15
16
17
18
19
20
21
22
23
24
25
26
27
28
29
30
31
32
33
34
35
36
37
38
39
40
41
42
43
44
45
46
47
def _prepare_4d_causal_attention_mask ( attention_mask: Optional [torch.Tensor], input_shape: Union [torch.Size, Tuple , List ], inputs_embeds: torch.Tensor, past_key_values_length: int , sliding_window: Optional [int ] = None , True , sliding_window=sliding_window)1 ] + past_key_values_lengthif attention_mask is not None :1 ], key_value_length, dtype=inputs_embeds.dtypeelse :0 ], input_shape[-1 ], key_value_length, dtype=inputs_embeds.dtype, device=inputs_embeds.devicereturn attention_maskdef to_causal_4d ( self, batch_size: int , query_length: int , key_value_length: int , dtype: torch.dtype = torch.float32, device: Union [torch.device, "str" ] = "cpu" , None if input_shape[-1 ] > 1 or self.sliding_window is not None :return causal_4d_mask
上面的函数输入是一个二维张量(batch_size, seq_len),输出是一个四维(batch_size, 1, seq_len, key_value_len)。该函数会去调用 AttentionMaskConverter 的 to_causal_4d 或 to_4d,而它们俩弯弯绕绕的,但最终仍离不开 _make_causal_mask:
1
2
3
4
5
6
7
8
9
10
11
12
13
14
15
16
17
18
19
20
21
22
23
def _make_causal_mask ( input_ids_shape: torch.Size, dtype: torch.dtype, device: torch.device, past_key_values_length: int = 0 , sliding_window: Optional [int ] = None , min , device=device)1 ), device=device)1 ).view(mask.size(-1 ), 1 ), 0 )if past_key_values_length > 0 :1 )if sliding_window is not None :1 1 - torch.triu(torch.ones_like(mask, dtype=torch.int ), diagonal=diagonal)bool (), torch.finfo(dtype).min )return mask[None , None , :, :].expand(bsz, 1 , tgt_len, tgt_len + past_key_values_length)
_make_causal_mask 函数最关键的是前几句话。首先 mask 会被初始化成 (batch_size, seq_len) 维度的矩阵,初始值为很大的负数👇。
1 mask = torch.full((tgt_len, tgt_len), torch.finfo(dtype).min , device=device)
然后使用 mask_cond 来将矩阵下半角矩阵归零 ,重点在mask_cond < (mask_cond + 1).view(mask.size(-1), 1)。此处两个横纵向量一比较会产生一个上三角矩阵。随后将全零矩阵与 mask 相连接,最后改变矩阵维度为 (bsz, 1, seq_len, key_value_len)返回。
1
2
mask_cond = torch.arange(mask.size(-1 ), device=device)1 ).view(mask.size(-1 ), 1 ), 0 )
这里大家不妨思考一下:为什么 Mask 矩阵必须是下三角归零,而上三角全为最小值?上文只是简单地说是为了防止“作弊”。具体原因是:生成文本序列时,模型只能参考之前的词,而不能参考未来生成的词。当 decoder 使用 masked 注意力机制生成输出时,计算 $ QK^T $ 的注意力权重时,我们允许 query 去查看之前生成词的信息,但不允许 query 查看之后生成的词(因为它们还未被产生)。对应到矩阵乘法中,就意味着 query 对应的行向量序号必须大于等于 key 的行向量序号。
译码层
好,我们在注意力掩码这边花了太多功夫了。接下来继续看 forward 函数的实现👇:首先是初始化张量,然后就是 llamaModel 对译码层的具体处理。对于这个主 for 循环,先抛开使用检查点的逻辑部分,直接看调用 decoder_layer 部分,就会发现循环只是在不断地调用 decoder_layer(也就是 LlamaDecoderLayer:forward)来进行推理,然后把得到的输出结果再作为下一层的输入继续前推,直到所有子层的前推结束。循环退出后,hidden_states 会最后加一层归一化,最后通过 transformers 自带的 BaseModelOutputWithPast 将最后的输出张量和 kv 相关信息返回,该类是框架中包含 past kv 值的基础模型输出类,关于此类就不详细展开讲了。
1 2 3 4 5 6 7 8 9 10 11 12 13 14 15 16 17 18 19 20 21 22 23 24 25 26 27 28 29 30 31 32 33 34 35 36 37 38 39 40 41 42 for idx, decoder_layer in enumerate (self.layers):if output_hidden_states:if past_key_values is not None else None if self.gradient_checkpointing and self.training:else :0 ]if use_cache:2 if output_attentions else 1 ],)if output_attentions:1 ],)if output_hidden_states:if use_cache else None if not return_dict:return tuple (v for v in [hidden_states, next_cache, all_hidden_states, all_self_attns] if v is not None )return BaseModelOutputWithPast(
篇外:for 循环中使用 gradient_checkpointing 可以有效节约显存,详细内容可以参考 torch.utils.checkpoint.checkpointdecoderLayer 进行前推时,不保存中间计算值。而若模型需要自动微分以完成 backward,程序会重新计算这些中间值,从而节省了模型运算需要的内存空间。因此,use_cache 和 gradient_checkpointing最好不要同时设置为 true,因为一个是用空间换时间,一个是时间换空间,两者可能会互相抵消优化影响。
最终成型
由于篇幅关系,这里仅介绍最常用的 LlamaForCausalLM,该模型是因果类语言模型,可以根据用户给的上文来续写下文,也可以回答用户提出的问题。
LlamaForCausalLM
LlamaForCausalLM 是 Llama 因果类语言模型,可以根据用户输入的文本输出相应的回答。技术上看,它在 LlamaModel 的基础上增加了一个线性层 lm_head 作为 Generator,从而实现了一个完整的语言模型。我们来看一下它的 forward 函数👇,若仔细对比之前模型的输入参数,会发现多了一个可选传入的 label 张量,该张量形状是 (batch_size, seq_len),它是用于计算 masked 语言模型的损失值。该模型的 forward 函数在准备好输入的参数后,就直接调用了 LlamaModel:forward()。
1
2
3
4
5
6
7
8
9
10
11
12
13
14
15
16
17
18
19
20
21
22
23
24
25
26
27
28
29
30
31
32
def forward ( self, input_ids: torch.LongTensor = None , attention_mask: Optional [torch.Tensor] = None , position_ids: Optional [torch.LongTensor] = None , past_key_values: Optional [List [torch.FloatTensor]] = None , inputs_embeds: Optional [torch.FloatTensor] = None , labels: Optional [torch.LongTensor] = None , use_cache: Optional [bool ] = None , output_attentions: Optional [bool ] = None , output_hidden_states: Optional [bool ] = None , return_dict: Optional [bool ] = None , Union [Tuple , CausalLMOutputWithPast]:if output_attentions is not None else self.config.output_attentionsif output_hidden_states is not None else self.config.output_hidden_statesif return_dict is not None else self.config.use_return_dict
随后,将拿到手的 outputs 放入到添加的线性层 lm_head 进行运算。同理,TP 并行时会将线性层的矩阵在 dim=0 维度拆分。若传入了 label,那么得到的结果 logits 在经过移位后计算交叉熵 CrossEntropyLoss(),若无则可直接通过 CausalLMOutputWithPast 返回。
1
2
3
4
5
6
7
8
9
10
11
12
13
14
15
16
17
18
19
20
21
22
23
24
25
26
27
28
29
30
hidden_states = outputs[0 ]if self.config.pretraining_tp > 1 :0 )for i in range (self.config.pretraining_tp)]1 )else :float ()None if labels is not None :1 , :].contiguous()1 :].contiguous()1 , self.config.vocab_size)1 )if not return_dict:1 :]return (loss,) + output if loss is not None else outputreturn CausalLMOutputWithPast(
使用 huggingface 框架实现的 LlamaForCausalLM 进行推理的示例如下,从该示例中我们可以更好地理解大模型的推理过程:比如说,上面的输入张量input_ids 是用户输入的处理后的“文本”。而最初用户输入的字符串prompt 先进入 tokenizer 进行分词,随后编码、嵌入技术变为张量。这里最重要的函数莫属于 model.generate,但它只能在推理时使用。它除了在背后默默调用了上面的 forward,还做了很多:用于多种解码策略,例如 beam search、top-k 采样等……详细的文章可以在这篇博客 中找到。生成产生的张量人类无法直接看懂,还需要经过解码 batch_decode 才能呈现流利的英语。
1
2
3
4
5
6
7
8
9
10
from transformers import AutoTokenizer, LlamaForCausalLM"Hey, are you conscious? Can you talk to me?" "pt" )30 )True , clean_up_tokenization_spaces=False )[0 ]"Hey, are you conscious? Can you talk to me?\nI'm not conscious, but I can talk to you."
小结
本文从 llama 是什么出发,深入解读了 huggingface 框架对 llama 的代码实现。我先从 llama 论文开始解读,试图让所有未接触过大模型的外行人能理解大模型是如何被训练产生的。随后,我给出了 llama 的架构图,并简要说明了 llama1/2 和 transformer 框架的区别,以及为何要这样改进。然后,我从基础到上层逐个分析了 llama 的代码实现,由于我也是第一次如此细致地阅读大模型的代码,因此很多地方可能会比较啰嗦。但万事开头难,在研究的最初阶段尽可能搞清楚最基本的东西,步步为营方能豁然开朗。另外,本篇博文必不可能覆盖 llama 乃至大模型的方方面面,我等还需继续努力,进一步揭开大模型的神秘面纱。