深入理解 Gem5 之一

深入理解 Gem5 之一

前言

近期研究需要,我开始研究 gem5 模拟器的底层实现 。gem5 模拟器是一款模块化的计算机系统架构研究平台,可用于研究系统级架构、处理器微架构。gem5 是一个具有开放治理模型的社区主导项目,最初是为学术界的计算机体系结构研究而构想的,目前已发展为学术界、工业研究和教学中的计算机系统设计。

根据 gem5 的 paper,gem5 框架融合了 M5GEMS 两者的实现。其中 M5 提供高度可配置的仿真框架,包含了多个 ISA 和多种 CPU 模型;而 GEMS 的详细而灵活的内存系统提供了对多个缓存一致性协议和互连模型的支持。目前,gem5 支持大多数商业 ISA(ARM、ALPHA、MIPS、Power、SPARC 和 x86),包括在其中三个(ARM、ALPHA 和 x86)上 booting Linux。

该项目是许多学术和工业机构共同努力的结果,包括 AMD、ARM、HP、MIPS、普林斯顿大学、麻省理工学院以及密歇根大学、德克萨斯大学和威斯康星大学。在过去的十年中,M5 和 GEMS 已在数百种出版物中使用,并已被下载数万次。 gem5 项目上的高水平协作,再加上组件部分的先前成功和类似 BSD 的自由许可证,使 gem5 成为一个有价值的全系统仿真工具。

在本博客中,我将探讨如何创建、调度事件,并深入理解背后的原理。

创建一个简单的事件

gem5 是一个事件驱动(Event-driven)的模拟器。在事件驱动模型中,每个事件(Event)都有一个回调函数用于处理事件。

下面以 HelloObject 类代码为例,在代码中添加一个事件触发时执行的新函数 processEvent()。此函数必须不带参数并且不返回任何内容。然后,添加一个 EventFunctionWrapper 类对象 event,并在构造函数中包装 processEvent()。最后,添加了一个 startup() 函数,其中使用 schedule() 函数开始调度事件,即让该事件安排在未来的某个时刻被触发(事件驱动的模拟不允许事件在过去执行)。

1
2
3
4
5
6
7
8
9
10
11
12
13
14
15
16
17
18
19
20
21
class HelloObject : public SimObject {
private:
void processEvent();
EventFunctionWrapper event;
public:
HelloObject(HelloObjectParams *p);
void startup();
};

HelloObject::HelloObject(HelloObjectParams *params)
: SimObject(params), event([this]{processEvent();}, name()) {
DPRINTF(Hello, "Created the hello object\n");
}

void HelloObject::startup() {
schedule(event, 100);
}

void HelloObject::processEvent() {
DPRINTF(Hello, "Hello world! Processing the event!\n");
}

上面的代码中,事件会在第 100 个 tick 时被触发。通常,需使用 curTick()时间偏移来确定事件触发的时间。但在这一简单示例中,开始模拟的函数(即 Python 配置文件中调用 simulate() 函数) 是以 tick = 0 的原点开始执行的,因此这里的 startup() 可以显式地标明要调度的时间点。

当运行 gem5 模拟器后,会得到如下输出,具体如何运行不是本博客的重点,感兴趣的读者可参考官方文档运行。从下面的输出信息可知,我们实现了在 100 tick 时执行 processEvent() 函数。

1
2
3
4
5
6
7
8
9
10
11
12
13
14
gem5 Simulator System.  http://gem5.org
gem5 is copyrighted software; use the --copyright option for details.

gem5 compiled Jan 4 2017 11:01:46
gem5 started Jan 4 2017 13:41:38
gem5 executing on chinook, pid 1834
command line: build/X86/gem5.opt --debug-flags=Hello configs/learning_gem5/part2/run_hello.py

Global frequency set at 1000000000000 ticks per second
0: hello: Created the hello object
Beginning simulation!
info: Entering event queue @ 0. Starting simulation...
100: hello: Hello world! Processing the event!
Exiting @ tick 18446744073709551615 because simulate() limit reached
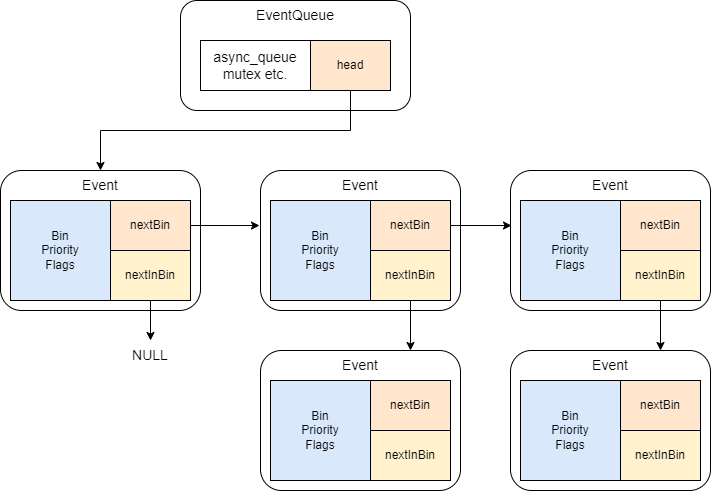
当然,processEvent() 也可以很复杂,甚至在执行 processEvent() 时再加入一个新的事件等待被触发:

1
2
3
4
5
6
7
8
9
void HelloObject::processEvent() {
timesLeft--;
DPRINTF(HelloExample, "Hello world! Processing the event! %d left\n", timesLeft);
if (timesLeft <= 0) {
DPRINTF(HelloExample, "Done firing!\n");
} else {
schedule(event, curTick() + latency);
}
}

上面代码中,在 timesleft 还未小于 0 时,processEvent() 函数每次打印出信息后,都会再次调用 schedule() 函数增加一个事件。注意,此处使用的 schedule() 函数 就利用了 curTick() 生成时间偏移量,进而指定了事件被调度的时间。


接下来,我会带领大家深入分析一下 gem5 的事件驱动原理,以及其代码实现细节。

EventBase 类

Gem5 是一个事件驱动的模拟器。因此,事件(Event)是模拟器的基本调度、执行单位,是一个非常重要的核心概念。事件可以理解为一系列改变系统状态的行为,包括但不限于对内存的读写、数据包的发送和到达等。模拟器整个的模拟过程就是对所有事件创建、调度、执行和终止的过程。从技术上讲,事件是由特殊的回调函数和一组状态信息位域实现的。对该事件的执行本质就是执行事件内的回调函数。本小节重点介绍事件的公共父类——EventBase 类,其内部定义了很多类的静态常量,方便事件之间共享标志位和优先级等定义。

优先级

EventBase 类定义的静态常量中,很大一部分是事件优先级(Priority)。这是用于区分在同一 cycle 中事件被处理的先后顺序的重要方式,事件包括 CPU 切换上下文、延迟写、DVFS 更新等。值得注意的是,优先级数值越小,事件的优先级越高。大多数事件在调度时都使用默认的优先级。

事件优先级 描述 优先级
Debug_Enable_Pri 调试启动的优先级,用于追踪可能 cycle 动作 -101
Debug_Break_Pri 断点的优先级,应该非常高否则会丢失信息 -100
CPU_Switch_Pri CPU 上下文切换优先级,切换需要先完成再处理其他事件 -31
Delayed_Writeback_Pri 延迟写回,在常规写回之前 -1
Default_Pri 默认的优先级 0
DVFS_Update_Pri DVFS 更新事件,会将所有相关的状态dump 出来 31
Serialize_Pri 序列化操作优先级 32
CPU_Tick_Pri CPU 下一拍优先级,必须在所有CPU事件后触发 50
CPU_Exit_Pri CPU 退出线程优先级 64
Stat_Event_Pri 输出统计信息的优先级,肯定在所有实质事件之后 90
Progress_Event_Pri 模拟的进程事件 95
Sim_Exit_Pri 标记模拟结束的事件 100

标志位

此外,EventBase 类还定义了一部分标志位,这些标志位要么是规定了用户的权限(可读或可写),要么是记录了事件处于的某种状态(squashed或Scheduled),也记录在此:

标志位 描述 常值
PublicRead 表示最低的6位是可被公开读的标志位 0x003f
PublicWrite 表示可被公开写的标志位 0x001d
Squashed 表示该事件已经 squashed 0x0001
Scheduled 表示事件已经被调度,该位不可公开写 0x0002
Managed Use life cycle manager 0x0004
AutoDelete 标志该事件 process() 后自动删除 0x0004
Reserved 该位被保留,预备后续使用 0x0008
IsExitEvent 标识该事件是否为 exit_event 0x0010
IsMainQueue 标识该事件是否位于main_queue 0x0020
Initialized somewhat random bits 0x7a40
InitMask 初始化位的掩码 0xffc0

Event 类

核心实现

事件类 Event 是 Gem5 中的核心类,是所有事件的父类。该类继承自 Serializable 类(这今后再详聊)和 EventBase 类。此外,Event 类为抽象类,内含有一个纯虚函数 process(),通常程序员需要通过 Event 的派生类来创建事件对象。但在此之前,我们必须深入了解该类的运行机制。下面列出 Event 类中一些重要的成员。

1
2
3
4
5
6
7
8
9
10
11
12
13
14
15
16
17
18
19
20
21
22
23
class Event : public EventBase, public Serializable {
Event *nextBin; // Bin defined as when+priority
Event *nextInBin;
Tick _when; // timestamp when event should be processed
Priority _priority; //!< event priority
Flags flags;
Counter instance; // event unique ID
EventQueue *queue;

static Event *insertBefore(Event *event, Event *curr);
static Event *removeItem(Event *event, Event *last);

virtual void process() = 0;
bool scheduled() const { return flags.isSet(Scheduled); }

// Managed event scheduled and being held in the event queue.
void acquire() { if (flags.isSet(Event::Managed)) acquireImpl(); }

// Managed event removed from the event queue.
void release() { if (flags.isSet(Event::Managed)) releaseImpl(); }

void setWhen(Tick when, EventQueue *q)
}

抽象类 Event 描述了事件这一核心概念,因而它也是整个底层机制的核心实现类。上节提到事件本质是由特殊的回调函数和一组状态标志位组成的,这体现在实现中便是类 Event 内部预留的虚函数 process(),以及存有运行时刻 _when,优先级 _priority,标记位 flags 和用于维护二维链表的两个指针变量 nextBinnextInBin 等,其中 nextBin 指向链表中下一项,而 nextInBin 指向 Bin (Bin = when + priority)相同的下一项事件。

在 Gem5 中,每个事件在被处理时都有一个纯虚函数 process()。每个继承了 Event 类的子类都必须实现。在处理事件时,还需要注意其中的标志位,并随时注意调整 cycle 周期。此外,事件获取 acquire() 和释放 release() 时的动作也可以被子类重载实现。使用 setwhen() 可以设置事件被触发的时间,并被指定的队列。

1
2
3
4
5
6
7
8
9
void setWhen(Tick when, EventQueue *q) {
_when = when;
#ifndef NDEBUG
queue = q;
#endif
#ifdef EVENTQ_DEBUG
whenScheduled = curTick();
#endif
}

派生类

Event 类的使用场景多见于 EventQueue 类内的实现。前文提到,由于类 Event 为抽象类,程序员需要通过类 Event 的派生类来创建事件对象,其中有两个派生类最为常用。一个是类 EventFunctionWrapper,其内部封装了一个执行函数。而另一个派生类是模板类 EventWrapper,它可以封装一个模板类,从而提供更加灵活的执行机制。若用户要直接使用 Event 类包装另一个类的对象,可能 EventWrapper 类或者 EventFunctionWrapper 更加合适:

1
2
3
4
5
6
7
8
9
10
11
12
13
14
15
16
17
18
19
20
21
22
23
24
25
26
template <class T, void (T::* F)()>
class EventWrapper : public Event {
private:
T *object;
public:
EventWrapper(T *obj, bool del = false, Priority p = Default_Pri)
: Event(p), object(obj) {
if (del)
setFlags(AutoDelete);
}
void process() { (object->*F)(); }
// ...
};

class EventFunctionWrapper : public Event {
private:
std::function<void(void)> callback;
std::string _name;
public:
EventFunctionWrapper(const std::function<void(void)> &callback, const std::string &name, bool del = false, Priority p = Default_Pri)
: Event(p), callback(callback), _name(name) {
if (del)
setFlags(AutoDelete);
}
void process() { callback(); }
};

EventQueue 类

事件队列(EventQueue)是管理系统事件的重要载体,类 EventQueue 用于描述该事件队列,它将被调度的事件按执行时间排列,其中队列头是执行时间最早的事件,执行时间一致的按照优先级高低在另一个维度上排列,形成了一个二维链表。每个线程都会维护一个局部的事件队列,事件会在队列中被调度(即插入到队列中)。

1
2
3
4
5
6
7
8
9
10
class EventQueue {
Event *head;
Tick _curTick;
//! Mutex to protect async queue.
UncontendedMutex async_queue_mutex;
//! List of events added by other threads to this event queue.
std::list<Event*> async_queue;
// taken when servicing events
UncontendedMutex service_mutex;
}

async_queue 和 async_queue_mutex 用于管理多线程下异步事件队列,而真正的链表头是 head。

Schedule

EventQueue 类重点还是在于 schedule() 函数,该函数负责事件调度,将创建好的事件插入到事件队列中,以备事件引擎执行。其参数是将要被执行的事件 event 和具体执行时间 when,global 参数用于判断队列是否被另一个线程运行。在 schedule() 中,设置完 event 的执行时间后,分成两个执行方式:同步插入和异步插入。

1
2
3
4
5
6
7
8
9
10
11
12
13
14
15
16
17
18
19
20
21
22
//! 当前的执行模式: parallel / serial
extern bool inParallelMode;

void schedule(Event *event, Tick when, bool global=false) {
event->setWhen(when, this);
// 两种模式:
// a. 异步插入:硬件线程将局部事件调度到一个不属于自己的其他队列 需要 `asyncq`.
// b. 全局调度:硬件线程将全局事件调度到 `asyncq` 需要维护全局事件的整体顺序
// See global_event.{cc,hh} for more explanation.
if (inParallelMode && (this != curEventQueue() || global)) {
// 异步插入
asyncInsert(event);
} else {
// 同步插入
insert(event);
}
event->flags.set(Event::Scheduled);
event->acquire();

if (debug::Event)
event->trace("scheduled");
}

同步插入

同步事件的调度需要调用 insert() 函数,且此时 global 参数为 false。这是很简单的链表插入动作,插入在插入点之前,符合编程惯例。之前提到,EventQueue 队列是一个二级链表,是由一串串单链表的头节点组成的链表。从以下代码可知,在 in Bin 链表中,使用头插法插入了新节点,因此二级链表是 LIFO 的。

1
2
3
4
5
6
7
8
9
10
11
12
13
14
15
16
17
18
19
20
21
22
23
24
25
26
27
28
29
30
Event *Event::insertBefore(Event *event, Event *curr) {
// 当前没有事件,或者插入的事件比头部还早 event进入 top 链表 'in bin'
if (!curr || *event < *curr) {
event->nextBin = curr;
event->nextInBin = NULL;
} else {
// 头插法 因此 in Bin 链表是LIFO的
event->nextBin = curr->nextBin;
event->nextInBin = curr;
}
return event;
}

void EventQueue::insert(Event *event) {
if (!head || *event <= *head) {
// call insertBefore()
head = Event::insertBefore(event, head);
return;
}
// 首先找打事件应位于哪个 'in bin'
Event *prev = head;
Event *curr = head->nextBin;
while (curr && *curr < *event) {
prev = curr;
curr = curr->nextBin;
}
// Note: this operation may render all nextBin pointers on the
// prev 'in bin' list stale (except for the top one)
prev->nextBin = Event::insertBefore(event, curr);
}

跨线程的事件调度

跨线程的事件调度可采用异步事件的调度方案(即将事件调度到另一个线程的事件队列中),此时 global 参数设置为 true。采取该做法时,因为事件队列被另一个线程运行,为防止冲突,asyncInsert() 会将事件暂时插入到异步队列 async_queue 中。

1
2
3
4
5
6
7
8
9
10
11
12
13
14
15
void EventQueue::asyncInsert(Event *event) {
async_queue_mutex.lock();
async_queue.push_back(event);
async_queue_mutex.unlock();
}

void EventQueue::handleAsyncInsertions() {
assert(this == curEventQueue());
async_queue_mutex.lock();
while (!async_queue.empty()) {
insert(async_queue.front());
async_queue.pop_front();
}
async_queue_mutex.unlock();
}

最后在每个模拟循环(或barrier)的最后时刻,async_queue 中的事件会被全部取出,然后捯饬到真正的事件队列中(见上述 handleAsyncInsertions() 函数)。

若要直接跨线程和事件队列地调度事件,或者获取目标事件队列的锁,在 schedule() 之外,还需要有特殊的机制避免死锁。原理也很简单:线程必须先自动放弃当前手中的事件队列锁,才能获得新事件队列锁,确保每个线程至多获取一个事件队列锁。该功能由 ScopedMigration 类负责,它将事件从一个事件队列暂时移植到另一个队列中。

1
2
3
4
5
6
7
8
9
10
11
12
13
14
15
16
17
18
19
20
21
22
/* Releasing the current queue, locking the new queue
* and updating curEventQueue(). This can, for example
* be useful when performing IO across thread event
* queues when timing is not crucial (e.g., during fast
* forwarding).
*/
ScopedMigration(EventQueue *_new_eq, bool _doMigrate = true)
:new_eq(*_new_eq), old_eq(*curEventQueue()),
doMigrate((&new_eq != &old_eq)&&_doMigrate) {
if (doMigrate) {
old_eq.unlock();
new_eq.lock();
curEventQueue(&new_eq);
}
}
// Temporarily migrate execution to a different event queue.
class EventQueue::ScopedMigration {
private:
EventQueue &new_eq;
EventQueue &old_eq;
bool doMigrate;
}

Deschedule

schedule() 函数的基础之上,还添加了 reschedule()deschedule() 等函数,方便事件队列的调度管理。其中 deschedule() 函数牵扯到链表的删除,也是比较平凡的实现。

1
2
3
4
5
6
7
8
9
10
11
12
13
14
15
16
17
18
19
20
21
22
23
24
25
26
27
28
29
30
31
32
33
34
35
36
37
38
39
40
41
42
43
44
45
46
void EventQueue::remove(Event *event) {
if (head == NULL)
panic("event not found!");
// deal with an event on the head's 'in bin' list (event has the same
// time as the head)
if (*head == *event) {
head = Event::removeItem(event, head);
return;
}
// Find the 'in bin' list that this event belongs on
Event *prev = head;
Event *curr = head->nextBin;
while (curr && *curr < *event) {
prev = curr;
curr = curr->nextBin;
}
if (!curr || *curr != *event)
panic("event not found!");
prev->nextBin = Event::removeItem(event, curr);
}

Event *Event::removeItem(Event *event, Event *top) {
Event *curr = top;
Event *next = top->nextInBin;
// if we removed the top item, we need to handle things specially
// and just remove the top item, fixing up the next bin pointer of
// the new top item
if (event == top) {
if (!next)
return top->nextBin;
next->nextBin = top->nextBin;
return next;
}
// Since we already checked the current element, we're going to
// keep checking event against the next element.
while (event != next) {
if (!next)
panic("event not found!");

curr = next;
next = next->nextInBin;
}
// remove next from the 'in bin' list since it's what we're looking for
curr->nextInBin = next->nextInBin;
return top;
}

Service

现在我们来看一下 EventQueue 中,Event 是如何被执行的:

1
2
3
4
5
6
7
8
9
10
11
12
13
14
15
16
17
18
19
20
21
22
23
24
25
26
Event *EventQueue::serviceOne() {
std::lock_guard<EventQueue> lock(*this);
Event *event = head;
Event *next = head->nextInBin;
event->flags.clear(Event::Scheduled);

if (next) {
next->nextBin = head->nextBin;
head = next;
} else head = head->nextBin;
if (!event->squashed()) {
// forward current cycle to the time when this event occurs.
setCurTick(event->when());
if (debug::Event)
event->trace("executed");
event->process();
if (event->isExitEvent()) {
assert(!event->flags.isSet(Event::Managed) ||
!event->flags.isSet(Event::IsMainQueue)); // would be silly
return event;
}
} else
event->flags.clear(Event::Squashed);
event->release();
return NULL;
}

当调用 ServiceOne() 函数时,默认是处理 EventQueue 中的第一个事件,取出第一个事件 event 后,在判断其是否 squashed(被压缩、合并),若不是被压缩的,那么直接将时间调整至事件处理时刻(事件驱动),随后调用 event->process() ,若是,那么仅需要清除标志位即可。

为降低用户使用难度,使用 EventManager 类来包装 EventQueue 类,包括常用的许多事件调度函数,而这些包装函数是 SimObject 类内经常调用的:

1
2
3
4
5
6
7
8
9
10
11
12
class EventManager {
private:
EventQueue *eventq;
public:
void schedule(Event &event, Tick when) {
eventq->schedule(&event, when);
}

void deschedule(Event &event) {
eventq->deschedule(&event);
}
};

对于创建事件的解释

现在,再回到 HelloObject 类上来,HelloObject 类继承了 SimObject 类。值得注意的是,SimObject 类是 gem5 中最重要的类之一,几乎所有的系统组件,如 CPU 、总线、Cache 等都需要继承 SimObject 类。根据代码,SimObject 类继承了 EventManager 类,EventManager 类中包装了一个 EventQueue 对象。因此,在 startup() 函数中使用的 schedule() 函数本质就是调用了 EventQueue::schedule() 函数:将事件 event 放入事件队列中,等待被调度。

另外,EventFunctionWrapper 类是 Event 类的子类,该类建立起了回调函数与事件对象的联系,当事件被触发后,回调函数会被执行。

1
2
3
4
5
6
7
8
9
10
11
12
13
14
15
16
17
class HelloObject : public SimObject {
private:
void processEvent();
EventFunctionWrapper event;
public:
HelloObject(HelloObjectParams *p);
void startup();
};

HelloObject::HelloObject(HelloObjectParams *params)
: SimObject(params), event([this]{processEvent();}, name()) {
DPRINTF(Hello, "Created the hello object\n");
}

void HelloObject::startup() {
schedule(event, 100);
}

深入理解 Gem5 之一
https://dingfen.github.io/2022/02/24/2022-2-24-gem5-1/
作者
Bill Ding
发布于
2022年2月24日
更新于
2024年4月9日
许可协议