Apollo Planning 规划模块

Apollo Planning 模块

前言

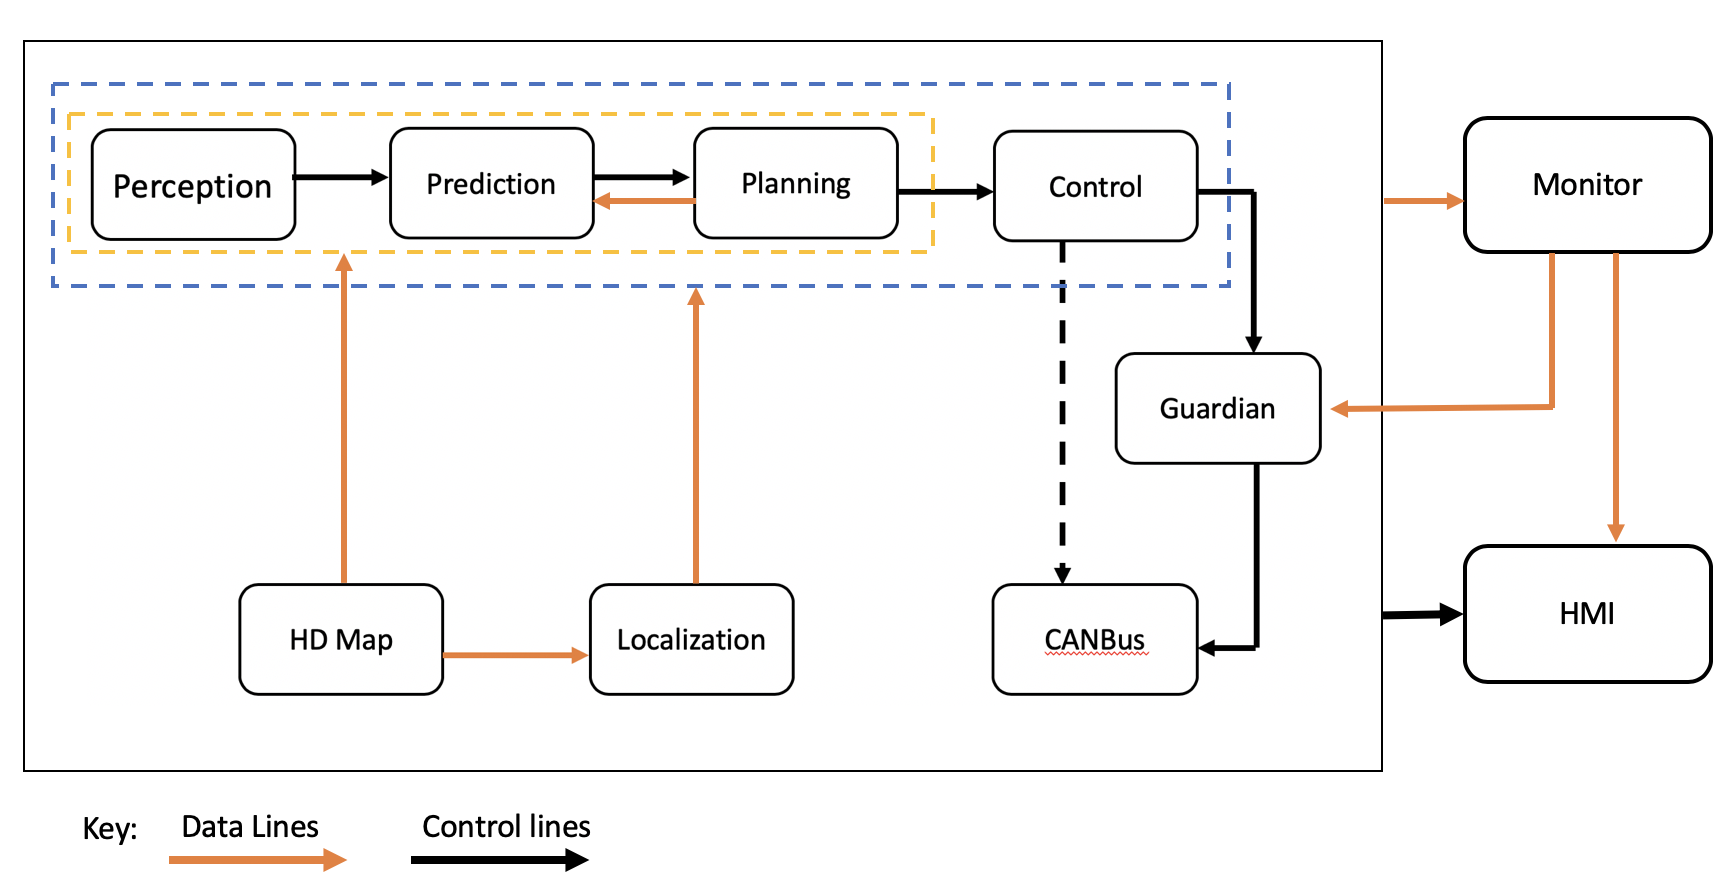
本篇博客对 Apollo 的规划(Planning)模块做详细介绍。根据官方文档1,规划模块的主要功能是对自动驾驶车辆未来的时空轨迹进行规划。为了让读者对规划模块在整个 Apollo 系统中的位置有一个大致的印象,我特意从官网上截取此图👇。可以看到规划模块的数据上游是定位(Localization),预测(Prediction),感知(Perception)模块,而下游是控制(Control)模块。

场景

规划模块中,Apollo 设计团队引入了场景的概念,每个驾驶案例都被当做为一个不同的驾驶场景,这使得规划模块更具模块化,且更有针对性。更重要的是,对一个特定场景的修改不会影响其他场景。Apollo 5.5 主要注重于城市道路上的沿车道线自动驾驶,并引入了两种新的规划场景2。这里主要介绍 5 种驾驶场景,由于篇幅原因,我就在这里做简要介绍,详细内容可以点击参考文献 [2]

沿车道线行驶

默认场景模式,该场景包括但不限于遵守基本交通规则,或者基本转弯的单车道(例如巡航)或变道。

会车

该场景包括了在有停:stop_sign: 标志的、有交通灯 :traffic_light: 的、什么都没有的十字路口上的会车情况。总的来说,自动驾驶车辆在遇到这些十字路口时,都会先抵达十字路口边,然后注意观察来往车辆并小心前进,最终通过十字路口

停车

停车场景中采用了一个令 Apollo 团队感到非常骄傲的 Open Space Planner 算法,该规划算法尤其适用于停车场景。文档中,一共介绍了两个子场景:

  • Valet 场景,用于将车辆停放在一个目标车位中

  • Pull Over 场景,用于到达目的地后,完成的路边停车任务。

即停即走(Park-and-go)

即停即走场景用于路边停车,并开始生成到达下一个目的地的新路径,有点像出租车放下一名乘客后的场景,对于路边交付,乘客接送或下车等情况非常有用。该场景将 Open Space Planner 算法与其他传统的轨迹规划算法结合在一起,以确保汽车不仅安全停车,而且还能够按照生成的轨迹驶出停车位。

紧急状况

紧急场景是为确保在给定触发事件的情况下(通过人工输入或由于一个或多个软硬件故障)让车辆能安全停下。 该场景对于城市驾驶极为重要,因为在道路上经常会遇到几种无法预料的情况,要求车辆完全停车。例如,有两种类型的紧急停车:

  • 靠边停车,自动驾驶车辆使用 Open Space Planner 靠边停车
  • 在车道停止,自动驾驶汽车在充分意识到周遭安全的情况下,在车道内停车

规划模块的体系结构

在 Apollo 5.5 版本中,Apollo 团队对规划模块的体系结构进行了修改,以纳入城市道路上的新驾驶方案。 如下图所示,因为新加入了有两种复杂方案:紧急情况和即停即走。为了有效地使用这些方案,团队引入了 2 个新的决策器—路径重用决策器(Path Reuse Decider)和限速决策器(Speed Bound Decider),并更新了现有决策器,使规划体系结构既强大又灵活,足以应付许多不同类型的城市道路驾驶方案。

每个驾驶场景都有其独特的驾驶参数集,使其更安全,高效,更易于自定义和调试,也更加灵活。

## 规划模块之组件类

如果你认真了解了 Apollo Cyber RT 组件的相关知识,就明白模块的起点就是 Component 类,一切的模块都是继承 Component 类而来的。自然地,我把这它作为全面认识规划模块的切入点。

1
2
3
4
5
6
7
8
9
10
11
12
13
14
15
16
17
18
19
20
21
22
23
24
25
26
27
28
29
30
class PlanningComponent final
: public cyber::Component<prediction::PredictionObstacles, canbus::Chassis,
localization::LocalizationEstimate> {
public:
bool Init() override;
bool Proc(const std::shared_ptr<prediction::PredictionObstacles>&
prediction_obstacles,
const std::shared_ptr<canbus::Chassis>& chassis,
const std::shared_ptr<localization::LocalizationEstimate>&
localization_estimate) override;
private:
std::shared_ptr<cyber::Reader<perception::TrafficLightDetection>>
traffic_light_reader_;
std::shared_ptr<cyber::Reader<routing::RoutingResponse>> routing_reader_;
std::shared_ptr<cyber::Reader<planning::PadMessage>> pad_msg_reader_;
std::shared_ptr<cyber::Reader<relative_map::MapMsg>> relative_map_reader_;
std::shared_ptr<cyber::Reader<storytelling::Stories>> story_telling_reader_;

std::shared_ptr<cyber::Writer<ADCTrajectory>> planning_writer_;
std::shared_ptr<cyber::Writer<routing::RoutingRequest>> rerouting_writer_;
std::shared_ptr<cyber::Writer<PlanningLearningData>>
planning_learning_data_writer_;
/* .... */
// 与 Reader 一一对应的私有变量
perception::TrafficLightDetection traffic_light_;
routing::RoutingResponse routing_;
planning::PadMessage pad_msg_;
relative_map::MapMsg relative_map_;
storytelling::Stories stories_;
};

我们一条条地看,PlanningComponent 类继承的是 Component<prediction::PredictionObstacles, canbus::Chassis, localization::LocalizationEstimate> 类,简单地说,从名字上看,PlanningComponent 类需要处理三类消息:

  • prediction::PredictionObstacles 预测的障碍物行为
  • canbus::Chassis canbus 总线传来的底盘状态
  • localization::LocalizationEstimate 来自定位模块的定位信息

但是,PlanningComponent 类内部有非常多的不同类型的订阅者 Reader 和发布者 Writer 。这些订阅者和发布者的用途,大都可以通过名称猜出个大概。值得注意的是,类的成员变量中,存在与 Reader 一一对应的变量,看起来它们是用于存放对应的 Reader 接收的消息,很快下文就证实了我的猜想:smiley:。

初始化

Init() 函数实现了模块初始化,在 modules/ 中的代码不论取名、类型还是函数实现都非常长,这点不同于 Cyber RT,因此在大多数情况下,我选择部分截取代码,如果想要看完整的代码,移步 modules/planning/planning_component.cc::Init()

1
2
3
4
5
6
7
8
9
10
11
12
13
14
15
16
injector_ = std::make_shared<DependencyInjector>();
if (FLAGS_use_navigation_mode)
planning_base_ = std::make_unique<NaviPlanning>(injector_);
else
planning_base_ = std::make_unique<OnLanePlanning>(injector_);

ACHECK(ComponentBase::GetProtoConfig(&config_))
<< "failed to load planning config file "
<< ComponentBase::ConfigFilePath();

if (FLAGS_planning_offline_learning ||
config_.learning_mode() != PlanningConfig::NO_LEARNING)
if (!message_process_.Init(config_, injector_))
return false;

planning_base_->Init(config_);

上面代码首先创建了一个 DependencyInjector 类的指针,然后根据 FLAGS_use_navigation_mode 模式的不同,选择创建不同的 PlanningBase 的子类,然后就是读取配置文件路径,再就是 PlanningBase 子类的初始化。先来说说这些规划子类的区别。

  • OpenSpacePlanning 主要的应用场景是自主泊车和狭窄路段的掉头,官方文档参考,但很奇怪的是,我没有找到相应的实现代码:confused:
  • NaviPlanning 主要用于在确定了导航路线的情况下的自动驾驶
  • OnLanePlanning 主要的应用于开放道路下沿车道线的自动驾驶。
1
2
3
4
5
6
7
8
9
10
11
12
  routing_reader_ = node_->CreateReader<RoutingResponse>(
config_.topic_config().routing_response_topic(),
[this](const std::shared_ptr<RoutingResponse>& routing) {
AINFO << "Received routing data: run routing callback."
<< routing->header().DebugString();
std::lock_guard<std::mutex> lock(mutex_);
routing_.CopyFrom(*routing);
});
// 接下来几个 Reader 类似的写法
planning_writer_ = node_->CreateWriter<ADCTrajectory>(
config_.topic_config().planning_trajectory_topic());
// 接下来的 Writer 类似的写法

紧接着,Init() 函数就用我之前博文中介绍的方式创建订阅者 Reader 和发布者 Writer 。仔细看上面给出的代码,CreateReader 函数的参数,一个是从配置文件中取得相应的配置信息,另一个是构建的回调函数。

咱们先来看一下后者:构建函数。根据我在这篇博客中所讲的流程,传入的回调函数是在 Reader 接收到消息后就会被调用的,从内容来看,Reader 在收到对应的消息后,调用 CopyFrom() 函数,把消息拷贝到自己的私有变量中。至于 Writer 就比较平凡了,就是获取了配置文件里相应的信息:man_shrugging:。

那么这个“配置文件中的相应信息”到底是什么信息呢:confused:?打开 modules/planning/conf/planning_config.pb.txt,你就会恍然大悟:point_down:,原来上面代码中的 config_.topic_config().planning_trajectory_topic() 就是一个字符串,对应的就是信道的名字。

1
2
3
4
5
6
7
8
9
10
11
12
13
14
topic_config {
chassis_topic: "/apollo/canbus/chassis"
hmi_status_topic: "/apollo/hmi/status"
localization_topic: "/apollo/localization/pose"
planning_pad_topic: "/apollo/planning/pad"
planning_trajectory_topic: "/apollo/planning"
prediction_topic: "/apollo/prediction"
relative_map_topic: "/apollo/relative_map"
routing_request_topic: "/apollo/routing_request"
routing_response_topic: "/apollo/routing_response"
story_telling_topic: "/apollo/storytelling"
traffic_light_detection_topic: "/apollo/perception/traffic_light"
planning_learning_data_topic: "/apollo/planning/learning_data"
}

这就是初始化函数的全部内容了。

处理

再来看 PlanningComponent::Proc() 函数,之前的博客中我说过,Proc() 函数是可以由用户自己编写完成的,而之后,该函数会被封装处理,最终让对应的协程开始执行。不同于在 Cyber RT 中的精雕细琢,我这次采用不同的办法,先快速过一遍 Proc() 函数,然后找出自己感兴趣的,进而深入研究。那么先来看 Proc() 函数的第一部分:

1
2
3
4
5
6
7
8
9
10
11
12
13
14
15
16
17
18
19
20
21
22
23
24
25
26
27
28
29
30
// 函数头前面已经给出了 这里就不放了 并去掉了一些错误诊断语句
// check and process possible rerouting request
CheckRerouting();

// process fused input data
local_view_.prediction_obstacles = prediction_obstacles;
local_view_.chassis = chassis;
local_view_.localization_estimate = localization_estimate;
{
std::lock_guard<std::mutex> lock(mutex_);
if (!local_view_.routing ||
hdmap::PncMap::IsNewRouting(*local_view_.routing, routing_)) {
local_view_.routing =
std::make_shared<routing::RoutingResponse>(routing_);
}
}
{
std::lock_guard<std::mutex> lock(mutex_);
local_view_.traffic_light =
std::make_shared<TrafficLightDetection>(traffic_light_);
local_view_.relative_map = std::make_shared<MapMsg>(relative_map_);
}
{
std::lock_guard<std::mutex> lock(mutex_);
local_view_.pad_msg = std::make_shared<PadMessage>(pad_msg_);
}
{
std::lock_guard<std::mutex> lock(mutex_);
local_view_.stories = std::make_shared<Stories>(stories_);
}

首先,Proc() 函数调用 CheckRerouting() 检查并处理了可能的重新路由需求,然后就是构建自己对象内的成员 local_view_ ,没错,为了防止多线程竞争,使用了非常多次的互斥锁:lock: 。该成员变量包含了所有规划模块需要的输入,这些输入信息非常重要,可能会经常使用,详细情况在下文的输入部分。

我们先把诸多疑问抛置脑后,直接来看 Proc() 函数的第二部分。

1
2
3
4
5
6
7
8
9
10
11
12
13
14
15
16
17
18
19
20
21
22
23
24
25
if (config_.learning_mode() != PlanningConfig::NO_LEARNING) {
// data process for online training
message_process_.OnChassis(*local_view_.chassis);
message_process_.OnPrediction(*local_view_.prediction_obstacles);
message_process_.OnRoutingResponse(*local_view_.routing);
message_process_.OnStoryTelling(*local_view_.stories);
message_process_.OnTrafficLightDetection(*local_view_.traffic_light);
message_process_.OnLocalization(*local_view_.localization_estimate);
}
// publish learning data frame for RL test
if (config_.learning_mode() == PlanningConfig::RL_TEST) {
PlanningLearningData planning_learning_data;
LearningDataFrame* learning_data_frame =
injector_->learning_based_data()->GetLatestLearningDataFrame();
if (learning_data_frame) {
planning_learning_data.mutable_learning_data_frame()
->CopyFrom(*learning_data_frame);
common::util::FillHeader(node_->Name(), &planning_learning_data);
planning_learning_data_writer_->Write(planning_learning_data);
} else {
AERROR << "fail to generate learning data frame";
return false;
}
return true;
}

从注释中看出,MessageProcess 类有用于线上训练的功能,在 learning_mode 打开时,它会收集刚刚输入得到信息。之后,injector_ 获得最新的学习数据帧(frame),并通过 planning_learning_data_writer_ 发布者发布,用于强化学习(Reinforcement Learning)测试。

同样,跳过学习部分(这不是我所关心的重点),再来看第三部分代码:

1
2
3
4
5
6
7
8
9
10
11
12
13
14
15
16
17
ADCTrajectory adc_trajectory_pb;
planning_base_->RunOnce(local_view_, &adc_trajectory_pb);
common::util::FillHeader(node_->Name(), &adc_trajectory_pb);

// modify trajectory relative time due to the timestamp change in header
auto start_time = adc_trajectory_pb.header().timestamp_sec();
const double dt = start_time - adc_trajectory_pb.header().timestamp_sec();
for (auto& p : *adc_trajectory_pb.mutable_trajectory_point()) {
p.set_relative_time(p.relative_time() + dt);
}
planning_writer_->Write(adc_trajectory_pb);

// record in history
auto* history = injector_->history();
history->Add(adc_trajectory_pb);

return true;

在第三部分代码中,首先调用 RunOnce() 函数生成了自动驾驶轨迹,放在了 ADCTrajectory 类的消息中,看来这就是生产规划路径的关键逻辑,这是我比较关心的。然后,根据注释,我推断,程序修改了轨迹中所有点的相对时间,并通过发布者 planning_writer_ 发送消息,最后进行历史记录。至此,PlanningComponent::Proc() 函数结束。

### 输入数据

前文说到,Proc() 函数先检查路由情况,再收集输入数据到 local_view_ 这个私有变量中。为了弄清模块的输入输出信息,进而了解整个 Apollo 系统的数据流通情况,我需要对输入数据做一个全面的解读。

1
2
3
4
5
6
7
8
9
10
struct LocalView {
std::shared_ptr<prediction::PredictionObstacles> prediction_obstacles;
std::shared_ptr<canbus::Chassis> chassis;
std::shared_ptr<localization::LocalizationEstimate> localization_estimate;
std::shared_ptr<perception::TrafficLightDetection> traffic_light;
std::shared_ptr<routing::RoutingResponse> routing;
std::shared_ptr<relative_map::MapMsg> relative_map;
std::shared_ptr<PadMessage> pad_msg;
std::shared_ptr<storytelling::Stories> stories;
};
  • prediction_obstacles 从信道中获得的指针,类型为 PredictionObstacles,代码文件在 modules/prediction/proto/prediction_obstacle.proto 中,该类型的消息来自预测模块,包含了以下信息:
    • Header 头结构:包含了这条消息发布的时刻(以秒为单位),目前位置的模块名,该消息的序列号(每个模块各自维护的)等,几乎每个消息都包含有这个头结构,下面就不提及了。
    • PredictionObstacle 预测模块中的若干个障碍物行为:有感知模块中的障碍物(PerceptionObstacle),它包括障碍物的 id,它的三维坐标、速度加速度、边界大小(长高宽)、特殊的形状、类型(行人、非机动车、机动车)、运动轨迹等;还有时间戳,记录 GPS 给出的时刻;还有预测的时间长度;多种可能的运动轨迹;障碍物的运动趋势、优先级等。
    • 开始的时间戳:记录预测开始的时刻
    • 结束时间戳:预测结束的时刻
    • 自动驾驶车辆的运动趋势,停止、正常行驶还是正在变道等
    • Scenery 现在的场景
  • chassis 从信道获得的指针,类型为 Chassis,这条消息直接来自总线 CanBus,代码文件在 modules/canbus/proto/chassis.proto 中,该类包含了很多信息,主要是汽车底盘所给出的机械状态信息,比如:
    • 驾驶模式,有手动驾驶、自动驾驶、仅控制方向、仅控制速度以及紧急模式
    • 档位情况、引擎转速、车辆速度、里程表、燃油情况、电池电量等
    • 刹车、油门踏板的力度,方向盘的旋转角度,车轮转速
    • 转向灯、雾灯、大灯的工作情况
  • localization_estimate 从信道中获得的指针,类型为 LocalizationEstimate,代码文件在 modules/localization/proto/localization.proto 中,这条消息来自定位模块,该类主要包含了:
    • Pose 位置姿势,包括车头朝向,在地图上的线速度、线加速度和相对位置,角速度、仰角度等
    • 测量上述姿势的时刻
    • 车辆已经经过的轨迹点列
    • MSF 定位状态与质量

上面的三条消息都是通过 Proc() 函数的参数传来的,回顾一下在通信里讲过的过程,这三条信息会被融合起来,随后程序会唤醒封装了 Component::Process() 的协程,让协程处于 Ready 状态,最后通过调度算法会让某个线程对它进行执行。而以下介绍的五条消息,与上三条不一样,这些消息,是通过 Reader 获得的,回顾在这篇博客里讲的订阅者内容,这些消息到来后,程序会唤醒封装了入队操作Reader 回调函数的协程,让它处于 Ready 状态,最后调度算法调度某个线程进行执行。接下来,我们就详细看一下这五条消息吧:

  • traffic_light 获得现在的交通信号灯情况,类型为 TrafficLightDetection ,来自感知模块,该类在 modules/perception/camera/lib/traffic_light/detector/detection/detection.h 中定义,主要是从摄像机拍摄的图片中获得目前的信号灯情况
  • routing 导航路线,类型为 RoutingResponse ,来自路由模块,从 RoutingComponent 类看出,RoutingResponse 就是该组件发布的消息类,类在 modules/routing/proto/routing.proto 文件中定义,RoutingResponse 包含有:
    • 导航中要通过的道路,以及总路程等
    • RoutingRequest 可理解为要响应的路由请求
    • 地图版本和现在的状态等
  • relative_map 相对地图,类型为 MapMsg,是RelativeMapComponent 类发出的一个相对地图消息,在 modules/map/relative_map/proto/navigation.proto 文件中定义,包含
    • Header 头结构
    • 车辆的高清的三维坐标,定位信息
    • 系统中的编号与对应的路名、车道表
    • 从感知模块中获得的车道线标记
  • pad_msg 便笺,类在 modules/planning/proto/pad_msg.proto 定义,除了一个头结构外,仅包含了驾驶动作,比如直行跟随,左右变道,靠边停车等。

生成轨迹

初始化小节中,根据 FLAGS_use_navigation_mode 的设置, planning_base_ 会指向不同的子类,或 NaviPlanning 类或是 OnLanePlanning 类,然后调用 RunOnce() 函数。

首先来看一下默认的规划类的 OnLanePlanning::RunOnce() 函数,回顾一下 Component::Proc() 函数的调用和组件的相关知识,你应该就会明白它是事件触发的,而不是时间触发的。该函数很长很复杂,很多地方我也并不关心(而且也看不懂),若有机会,可以细致地研究一下,大体上,它完成了以下步骤:

1
2
3
4
5
6
7
8
9
10
11
12
13
14
15
void OnLanePlanning::RunOnce(const LocalView& local_view,
ADCTrajectory* const ptr_trajectory_pb) {
// 更新汽车状态和参考线的状态,如果状态无效,直接返回
// ...
// 是否为出现导航路线变换,如果是 初始化 planner
// 加上预估的规划触发的周期 得到 stitchingTrajectory
// planning is triggered by prediction data, but we can still use an estimated
// cycle time for stitching
status = InitFrame(frame_num, stitching_trajectory.back(), vehicle_state);
// 判断是否符合交通规则
// 开始正在的规划 planner 开始规划
status = Plan(start_timestamp, stitching_trajectory, ptr_trajectory_pb);
// 记录规划所花费的时间
// ...
}

那么 Planner 又是什么东西呢?事实上才 OnLanePlanning::Init() 函数中就已经根据配置文件,由 PlannerDispatcher 指定了。我一共发现 4 种用于不同场景的 Planner

  • RTKReplayPlanner 根据录制的轨迹来规划行车路线
  • PublicRoadPlanner 开放道路的轨迹规划器
  • LatticePlanner 基于网格算法的轨迹规划器
  • NaviPlanner 基于实时相对地图的规划器

未完待续……

参考

[1] Github Apollo

[2] Apollo Planning Docs

[3] apollo介绍之planning模块


Apollo Planning 规划模块
https://dingfen.github.io/2020/11/11/2020-11-11-ApolloPlanning/
作者
Bill Ding
发布于
2020年11月11日
更新于
2024年4月9日
许可协议